No tutorials match those words. Try one word, such as “scan” or “password”, or choose Clear.
TUTORIAL 01
Start Here: open Driver and sign in
What you will do
Open Brummel Driver and find your work.
Before you start
Park the vehicle safely before training or using the app.
Have the email and password provided for your Driver account.
Connect your phone to the internet.
Watch this task
Read the video transcript
Start using Brummel Driver
Welcome to Brummel Driver. Park safely before you start this training or use the app.
Open your phone's browser. Enter driver dot brummel trucks dot com in the address bar.
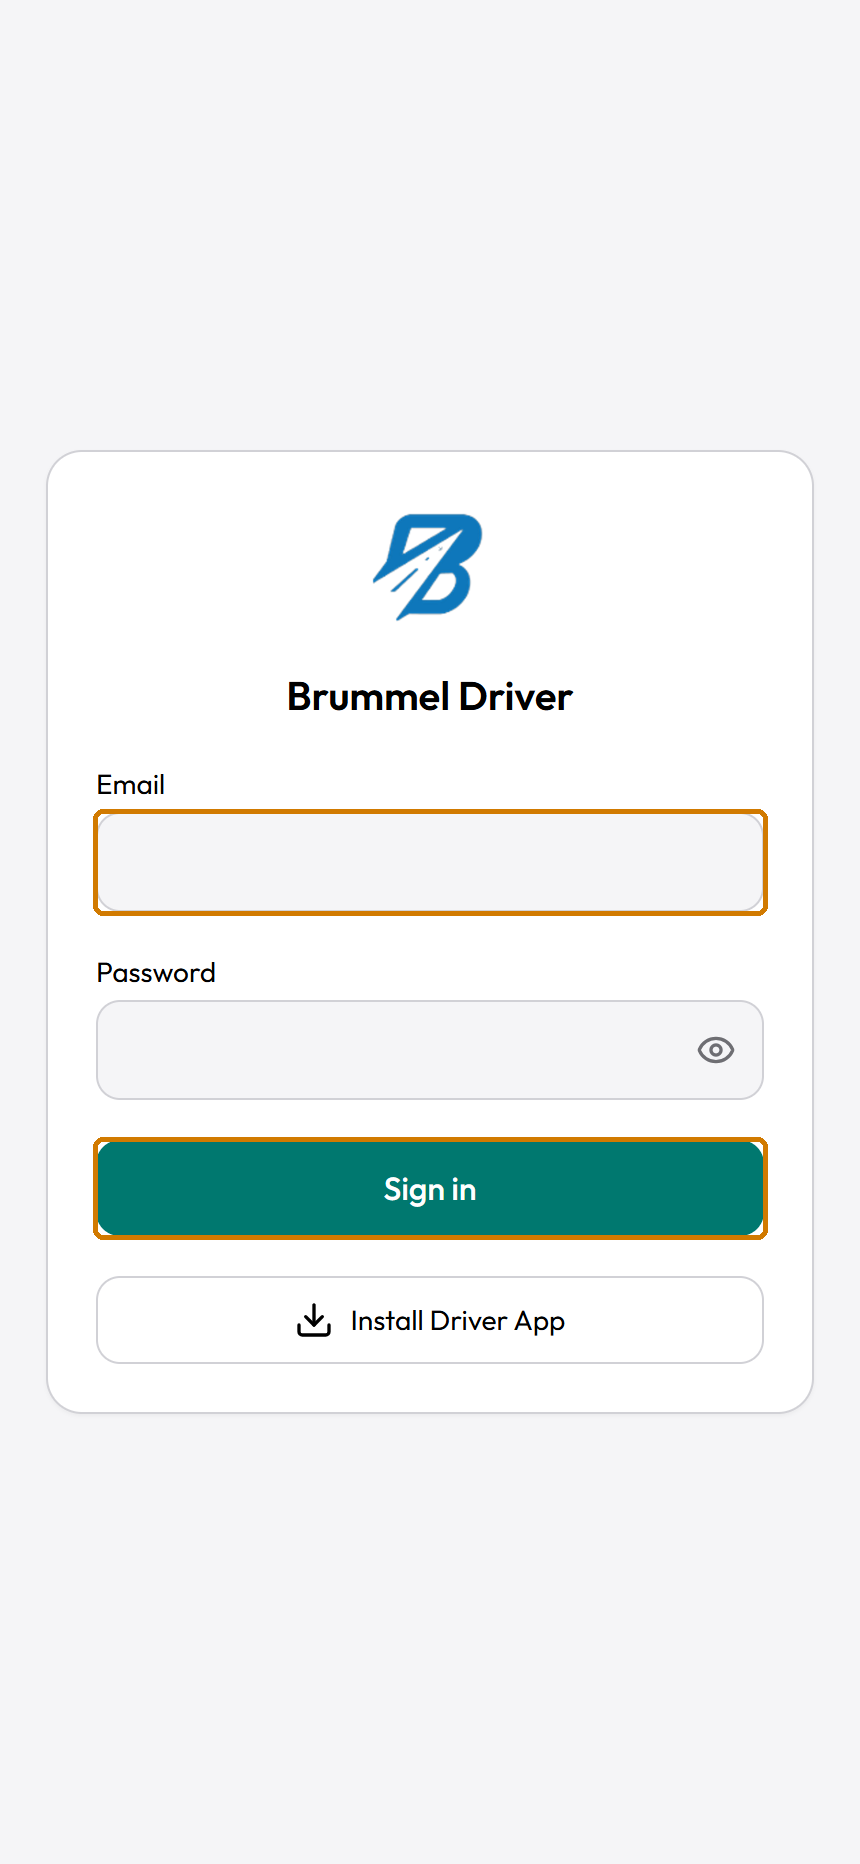
Check that the Brummel Driver sign-in screen appears. Use the account provided for your work.
Tap Email. Enter your own account email address, and check the spelling.
Tap Password. Enter your password. Keep your screen private if you use Show password.
Tap Sign in. Wait while Driver checks your account.
If Verification code appears, enter the six-digit code from your configured authenticator. Then tap Sign in again.
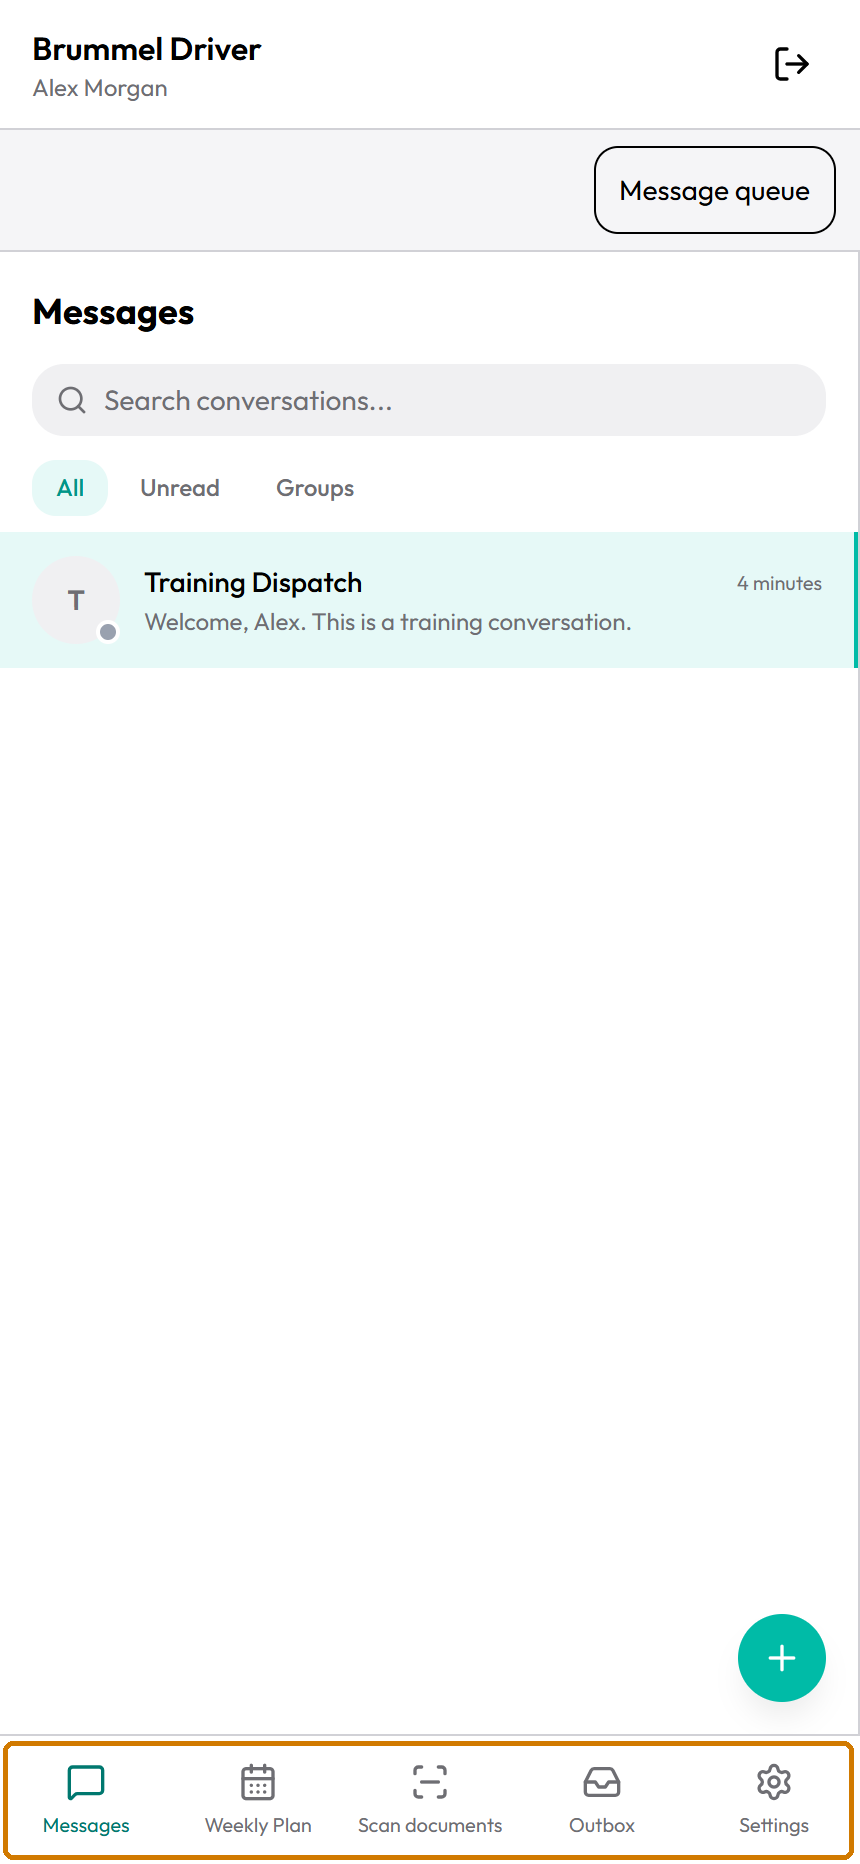
Check your name at the top. You are signed in when your name and the bottom tabs appear.
Tap a bottom tab to find your task. If access fails, contact the person who supplied your account.
The narration is AI-generated. The written steps teach the same task.
Follow these steps
Open your phone's web browser.Use the browser address bar.
Enter https://driver.brummeltrucks.com.Check the spelling before continuing.
Open the address.The Brummel Driver sign-in form appears.Sign in with your own account. The eye icon shows or hides the password. Training example.
Tap Email.The phone keyboard opens.
Enter your account email.Use your own account. The training name Alex Morgan is fictional.
Tap Password.The password field hides the characters.
Enter your password.Check for extra spaces if you pasted it.
Tap the eye icon (Show password) if you need to check your entry.Keep the screen private while the password is visible.
Tap the eye icon again (Hide password) when finished.The password characters are hidden again.
Tap Sign in.Wait while the app checks your account.
If Verification code appears, enter the six-digit code from your configured authenticator.This extra step appears only on accounts that require it.
Tap Sign in again if the verification form is shown.Your name should appear at the top of Driver.
Check your name.If it is not your name, stop and contact your existing Brummel contact.
Tap a bottom tab to open a task.Messages, Weekly Plan, Scan documents, Outbox, and Settings are the main areas.Your name is at the top. The five main tabs are at the bottom. Training example.
You are done when
Your own name and the Driver navigation are visible.
If something goes wrong
The sign-in form shows an error.Read the message. Check your email and password. If you do not know them or Driver access cannot be verified, ask the Brummel contact who supplied your account.
Sign in is unavailable while offline.Restore your connection before signing in.
The app asks you to sign in again.Use the same account. Opening a new browser or Home Screen icon may require another sign-in.
Keep in mind
Tap means touch an item once. To see more of a page, slide your finger upward. This guide uses English labels; choose English in Settings if needed.
This guide covers the mobile website. It does not teach a separate native Android or iPhone app.
Alex Morgan, truck TRAIN-101, and load TRAIN-2048 are training examples. Sample documents are marked SAMPLE — TRAINING ONLY.
Messages has its own Message queue for pending text, photos, files, and voice notes. The bottom Outbox tab is for scanned documents.
TUTORIAL 02
Add Driver to your Home Screen
What you will do
Open Driver from an icon on your phone.
Before you start
Open the real Driver website while connected.
Follow only the steps marked for your device, then the steps marked for any device. Browser screens and labels may vary.
Watch this task
Read the video transcript
Add a Home Screen icon
Add a Driver icon so you can open the app from your phone's Home Screen.
Open the real Driver website. Tap Install Driver App on the sign-in page or in Settings.
On Android, a browser installation prompt may open. Confirm that prompt and wait for it to finish.
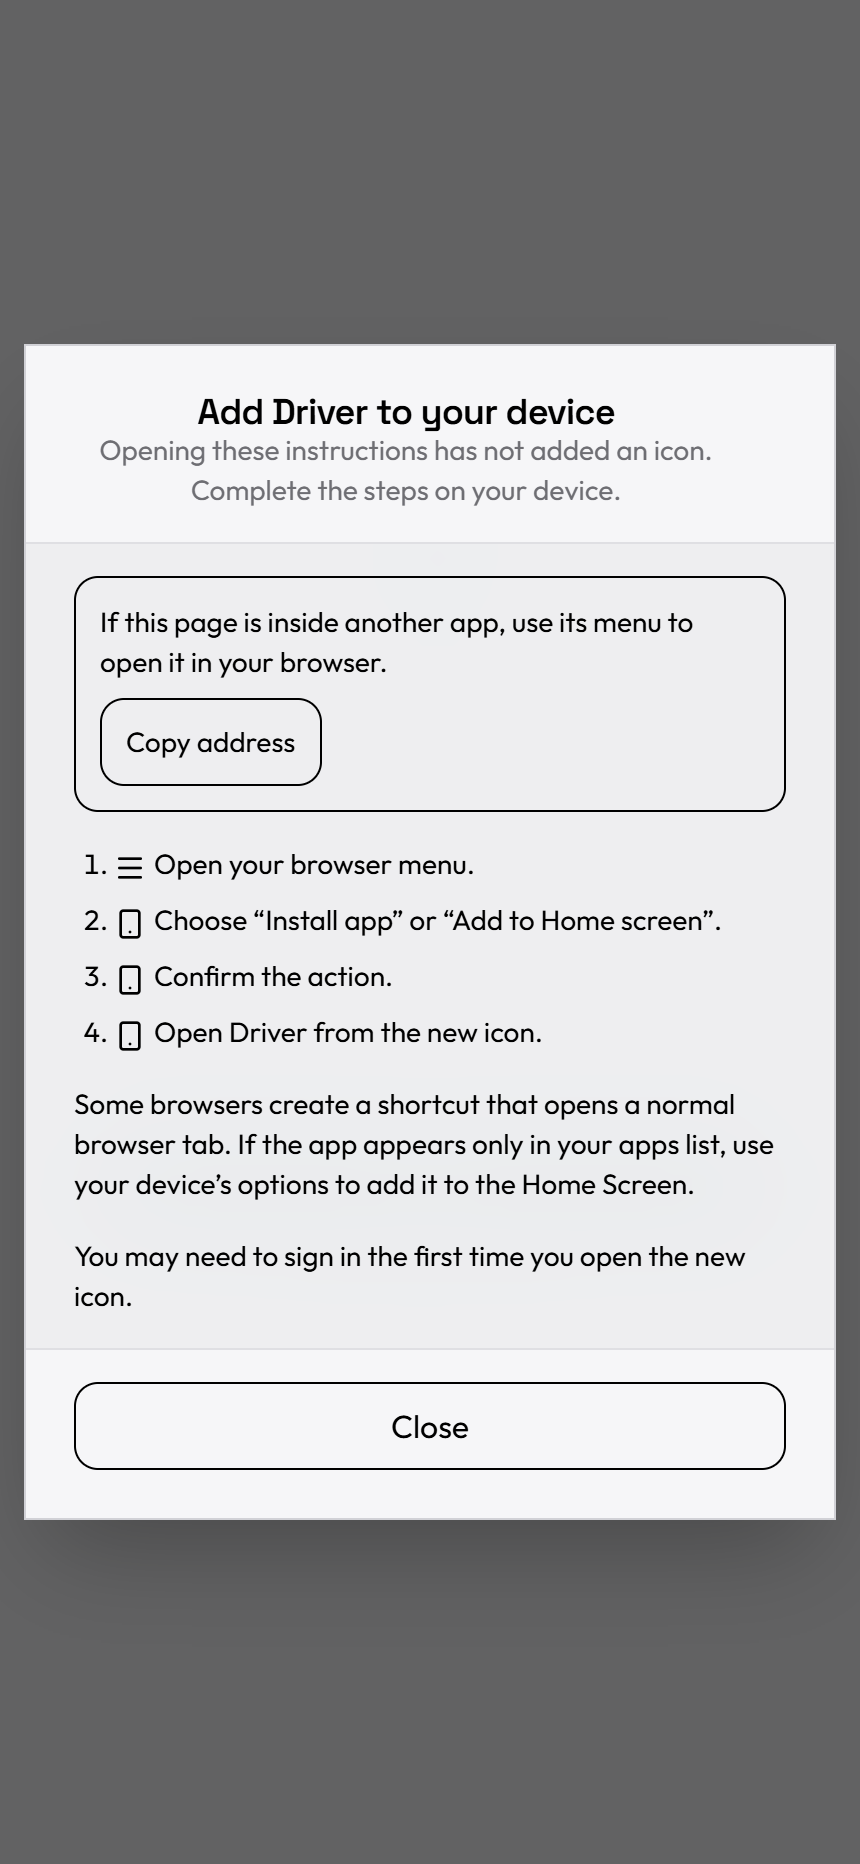
If instructions appear instead, the app is not installed yet. Follow the Android steps shown on the screen.
You can also open your browser menu. Look for Install app or Add to Home screen.
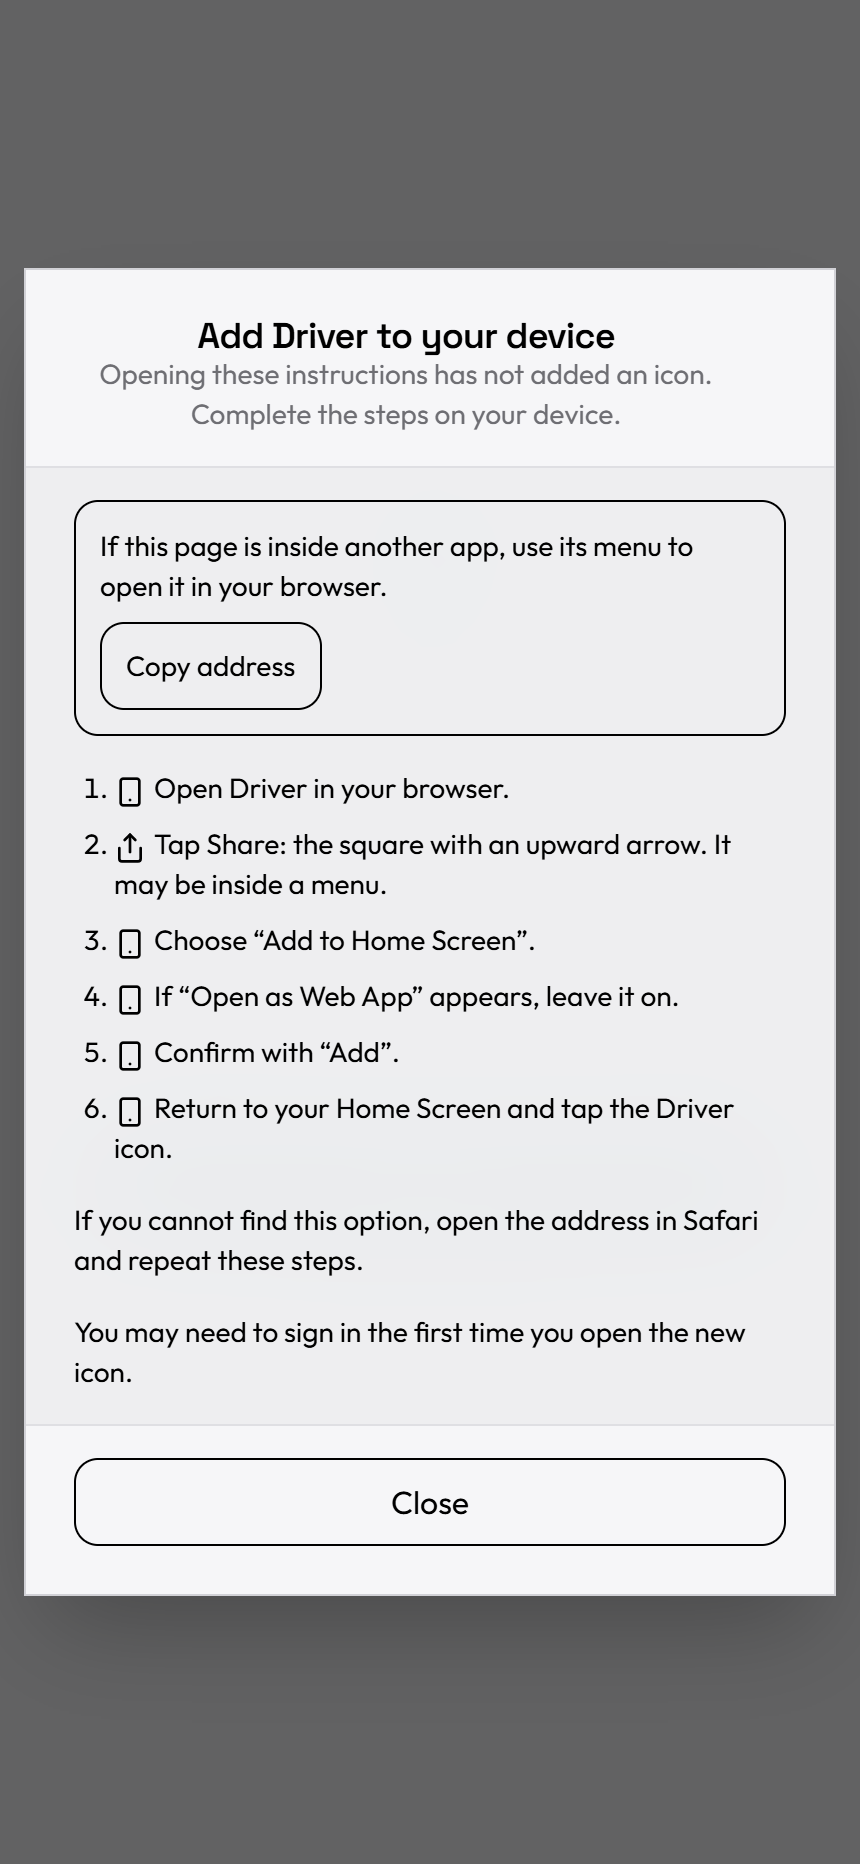
On iPhone or iPad, open Driver in Safari. Tap Share. Some Safari layouts place Share under More.
Choose Add to Home Screen. Confirm the add action. Leave Open as Web App enabled if it appears.
Return to the Home Screen and tap the new Driver icon. Sign in again if asked.
You are done when that icon opens Driver. If installation is unavailable, you can still use the website.
The narration is AI-generated. The written steps teach the same task.
Follow these steps
Find Install Driver App on the sign-in page or in Settings.You can use this button to start installation or open instructions.
Tap Install Driver App.A browser install prompt or Add Driver to your device opens. Instructions alone do not add an icon.
Android: choose Android if Choose your device appears.Driver normally selects your device automatically.
Android: confirm installation if a browser prompt appears.When it finishes, continue with the steps marked Any device below.
Android without a prompt: open the browser menu.Look for Install app or Add to Home screen. The label may differ.
Android without a prompt: choose the installation or Home Screen option.The browser shows its confirmation screen.
Android without a prompt: confirm the browser action.Wait for installation to finish.
iPhone or iPad: open Driver in Safari.Use https://driver.brummeltrucks.com.
iPhone or iPad: tap Safari's Share button.On some Safari layouts, Share is inside the More menu.
iPhone or iPad: choose Add to Home Screen.The browser shows the add screen.
iPhone or iPad: leave Open as Web App enabled if it appears.This option is not shown on every version.
iPhone or iPad: confirm the add action.The icon is added to your Home Screen.
Any device: return to the phone's Home Screen.Look for the new Driver icon.
Any device: tap the new icon.Driver opens. Sign in again if asked.
In the installation instructions, tap Copy address if you need the website address.Address copied. confirms the copy. If copying fails, use driver.brummeltrucks.com.
Tap Close when you are finished with the installation instructions.You return to Driver.
Android installation guidance inside Driver. Complete the browser's own add or install step. Training example.iPhone and iPad guidance inside Driver. Finish adding the icon in Safari. Training example.
You are done when
The Home Screen icon opens the Brummel Driver website.
If something goes wrong
There is no automatic install prompt.Use the manual instructions for your browser. A missing prompt does not mean the website is unavailable.
Add to Home Screen is missing on iPhone or iPad.Open the address directly in Safari instead of an in-app browser, then check Share again.
You cannot find the icon.Check the phone's other Home Screen pages or app search. You can still open the website in your browser.
Keep in mind
Installing an icon does not prove that notifications or background calls are enabled. Keep the app open for tasks that need a connection.
TUTORIAL 03
Find or start a conversation
What you will do
Open the right conversation before sending anything.
Before you start
Sign in.
Have a connection to load current conversations and contacts.
Follow these steps
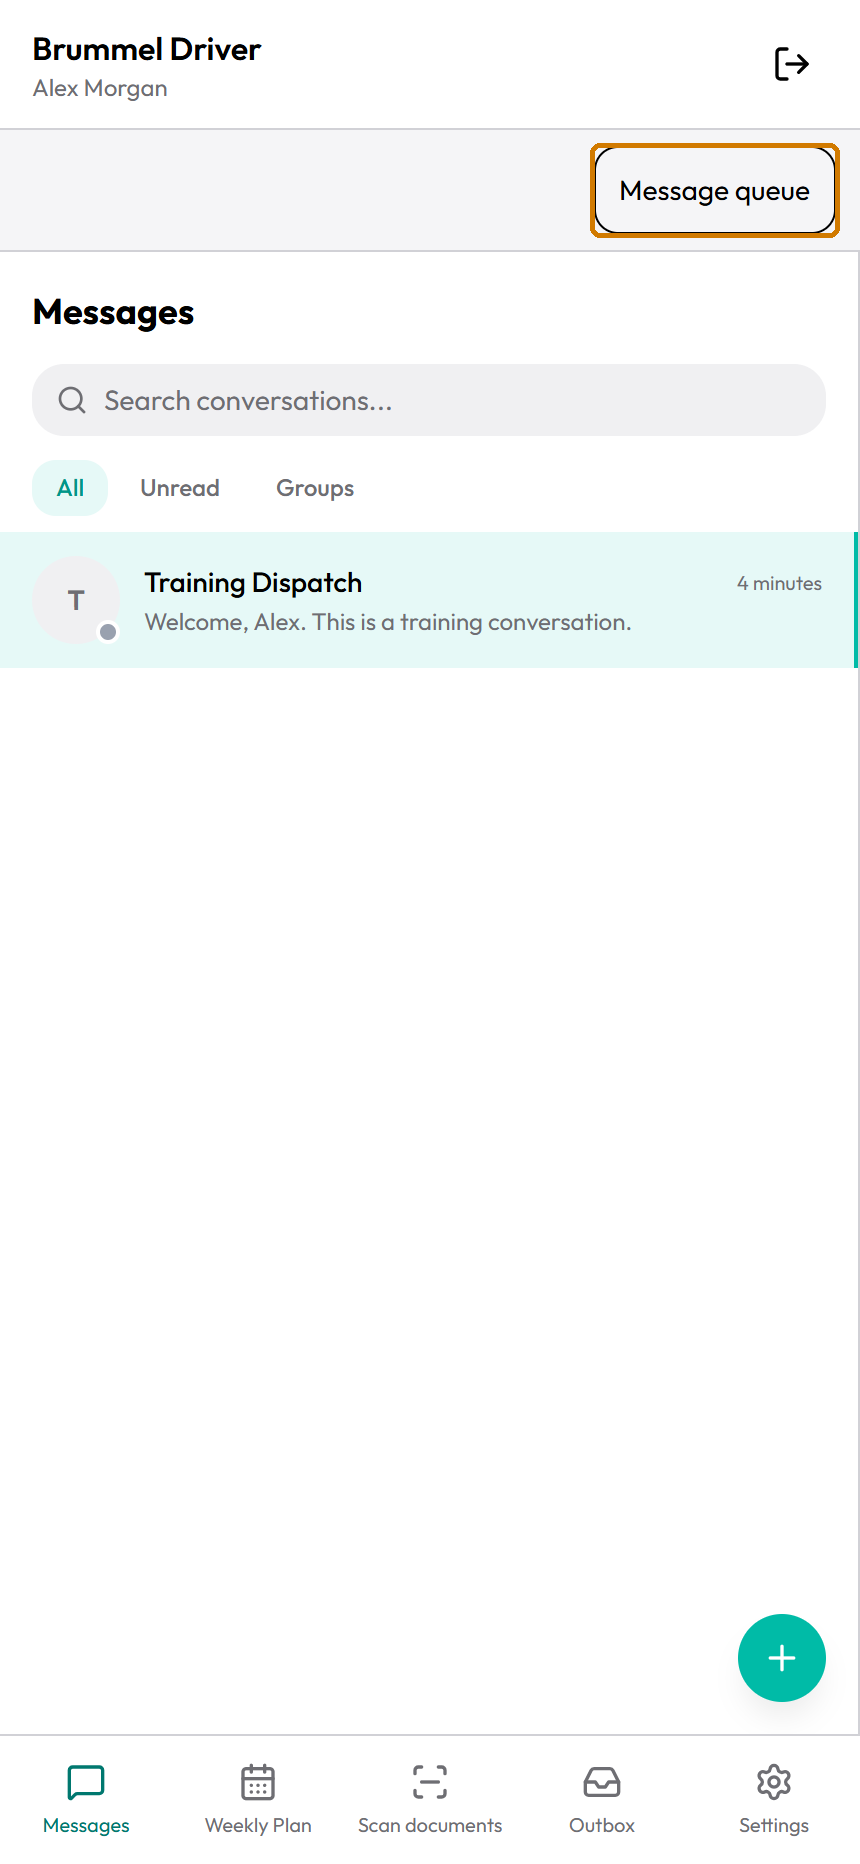
Tap Messages.The conversation list appears.Find the correct conversation. All, Unread, and Groups change the list. Training example.
Tap Search conversations....The search field is ready.
Enter part of the person's name or a word in the last-message preview.Matching conversations remain in the list.
Tap All to show all matching conversations.Clear the search text if you want the full list.
Tap Unread to show conversations with unread messages.The list contains matching unread conversations.
Tap Groups if you want group conversations instead.The group filter is selected.
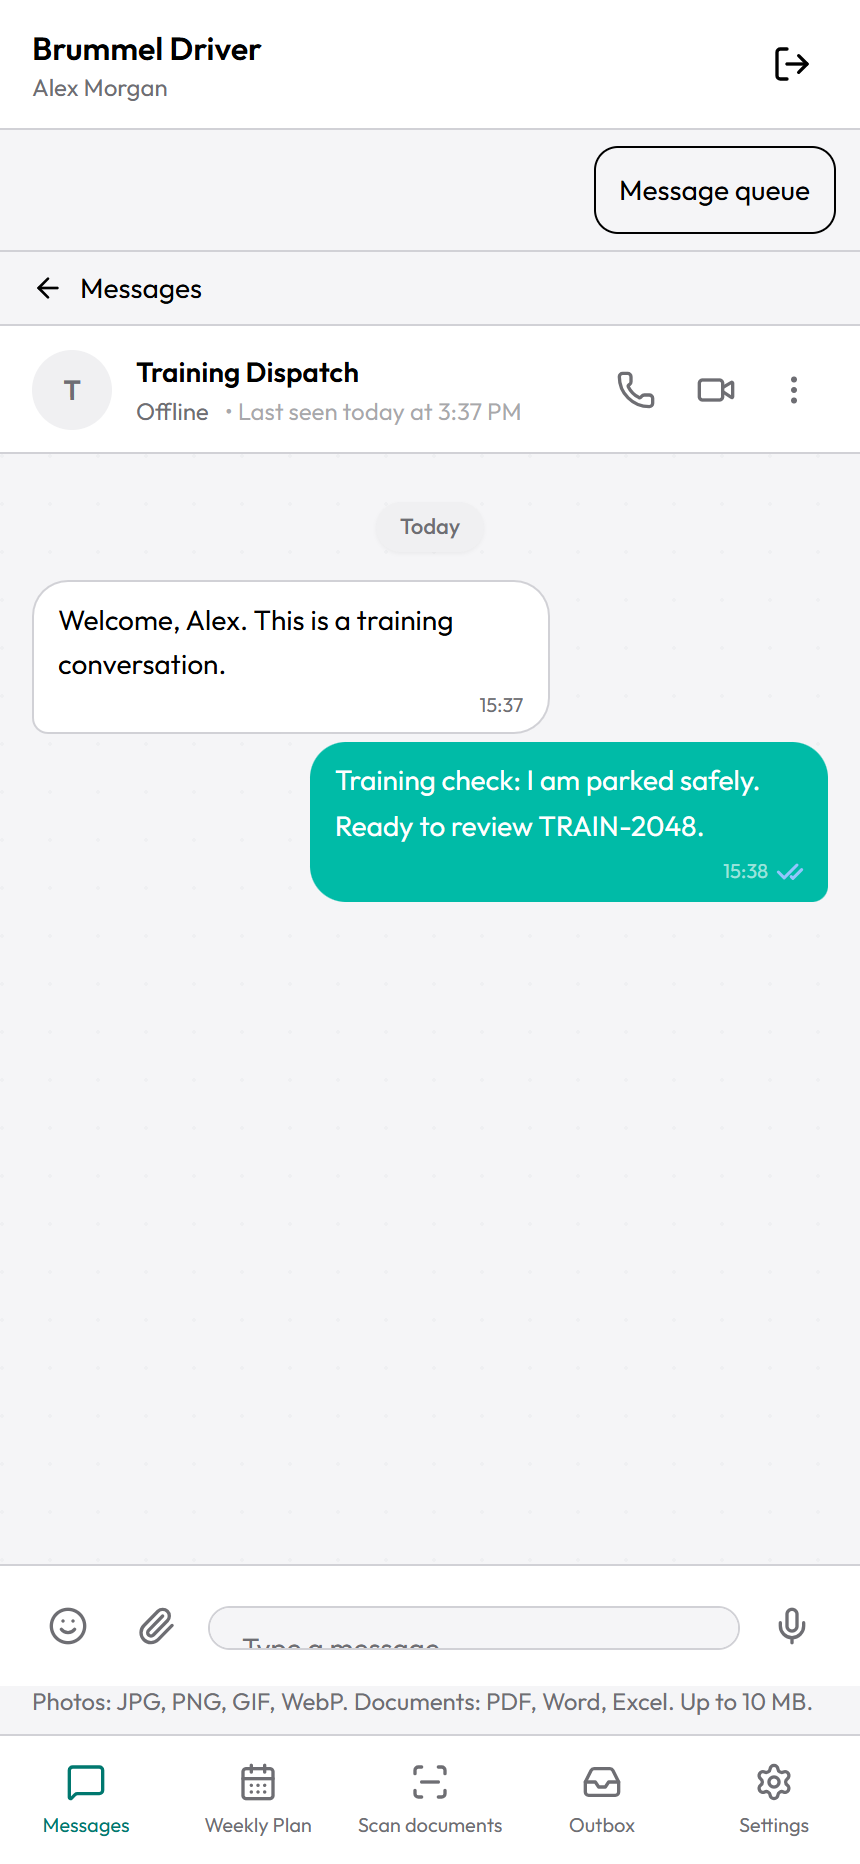
Tap the conversation you need.Check the name at the top.Check the contact's name at the top before sending anything. Training example.
Scroll upward to read earlier messages.Earlier messages load as you move through the history.
Scroll downward to return to recent messages.Use the down-arrow button when it appears.
Tap the Messages back button to return to the conversation list.The bottom Messages tab also opens the messages area.
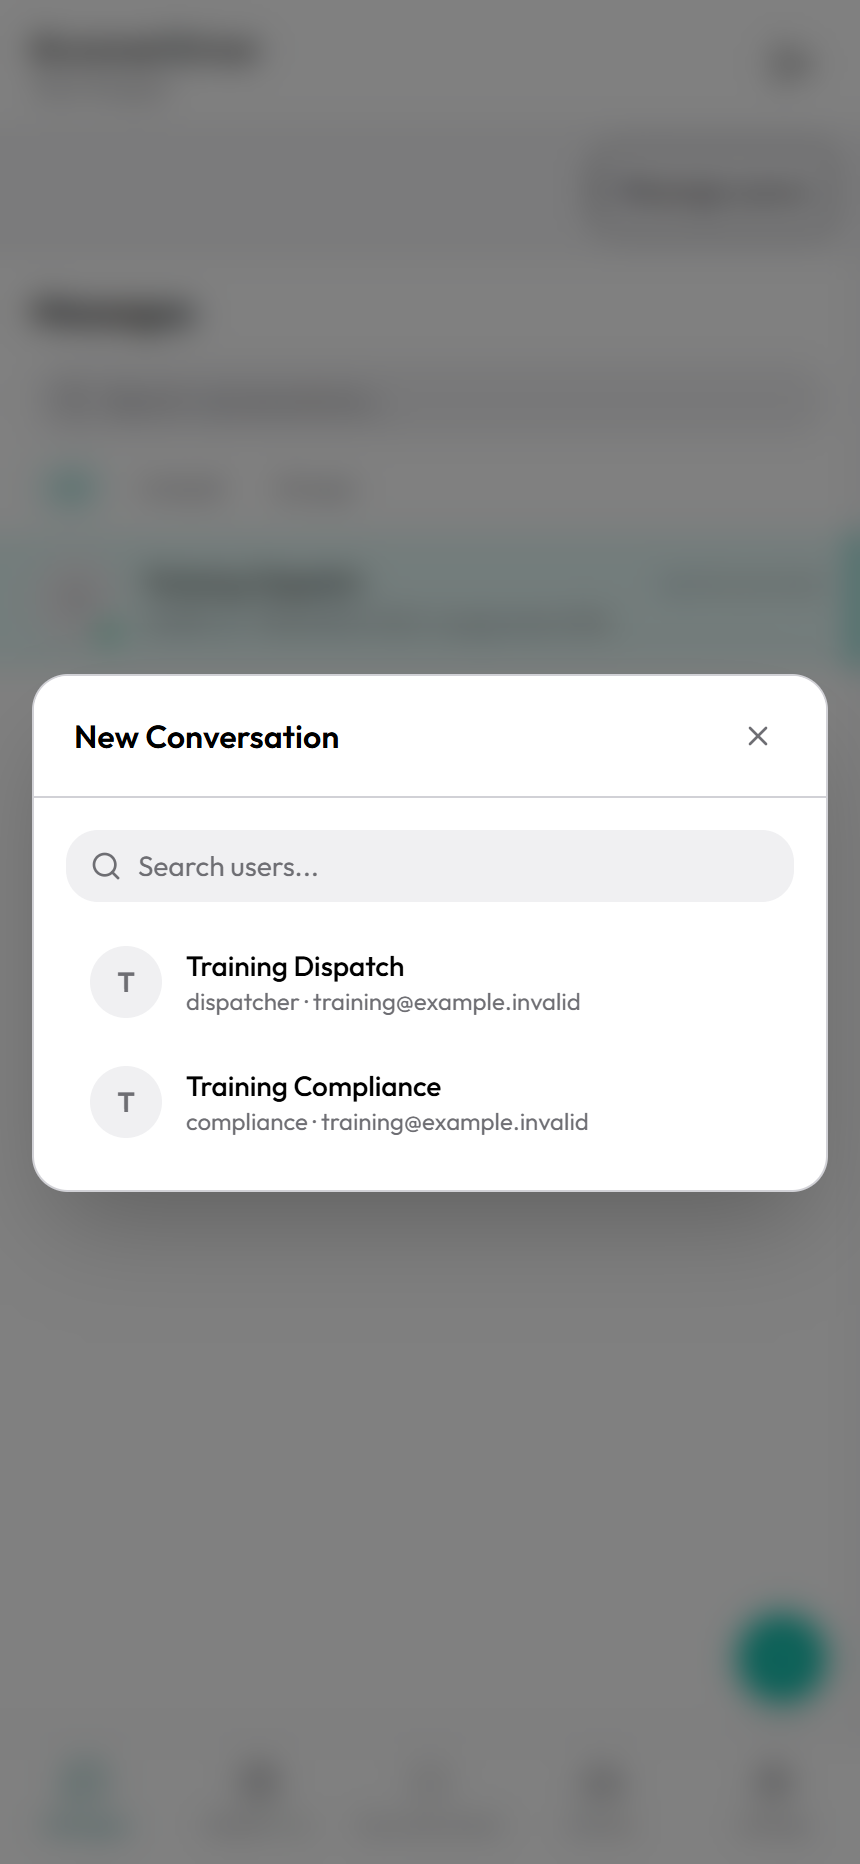
To start a new conversation, tap the + button in the conversation list.A small menu opens.
Tap New Conversation.A contact picker appears.Choose the intended person before starting a conversation. Training example.
Enter a name in Search users....Only contacts available to your account are offered.
Tap the correct person.The existing or new direct conversation opens.
You are done when
The correct person's name or group name appears above the messages.
If something goes wrong
No conversations found appears.Clear the search and choose All. Check your connection.
A person is missing from the picker.Access is controlled by Brummel. Ask your existing company contact; do not use another person's account.
A conversation has a creator-only sending notice.It is a broadcast channel. Read the posts and use a separate allowed conversation to respond.
Keep in mind
A contact's Online, Away, Busy, or Offline label is presence information. It does not confirm that the person has read a specific message.
TUTORIAL 04
Write and send a message
What you will do
Send text and check that Brummel received it.
Before you start
Open the correct conversation.
Check the person's or group's name.
Watch this task
Read the video transcript
Send a message
Use Messages to send a clear note to the right person. Start with the vehicle parked safely.
Tap Messages. Find the conversation you need. Search conversations can help you find a name.
Open the conversation. Check the name at the top before you type anything.
Tap Type a message. Enter your note. Correct any mistakes while the text is still in the box.
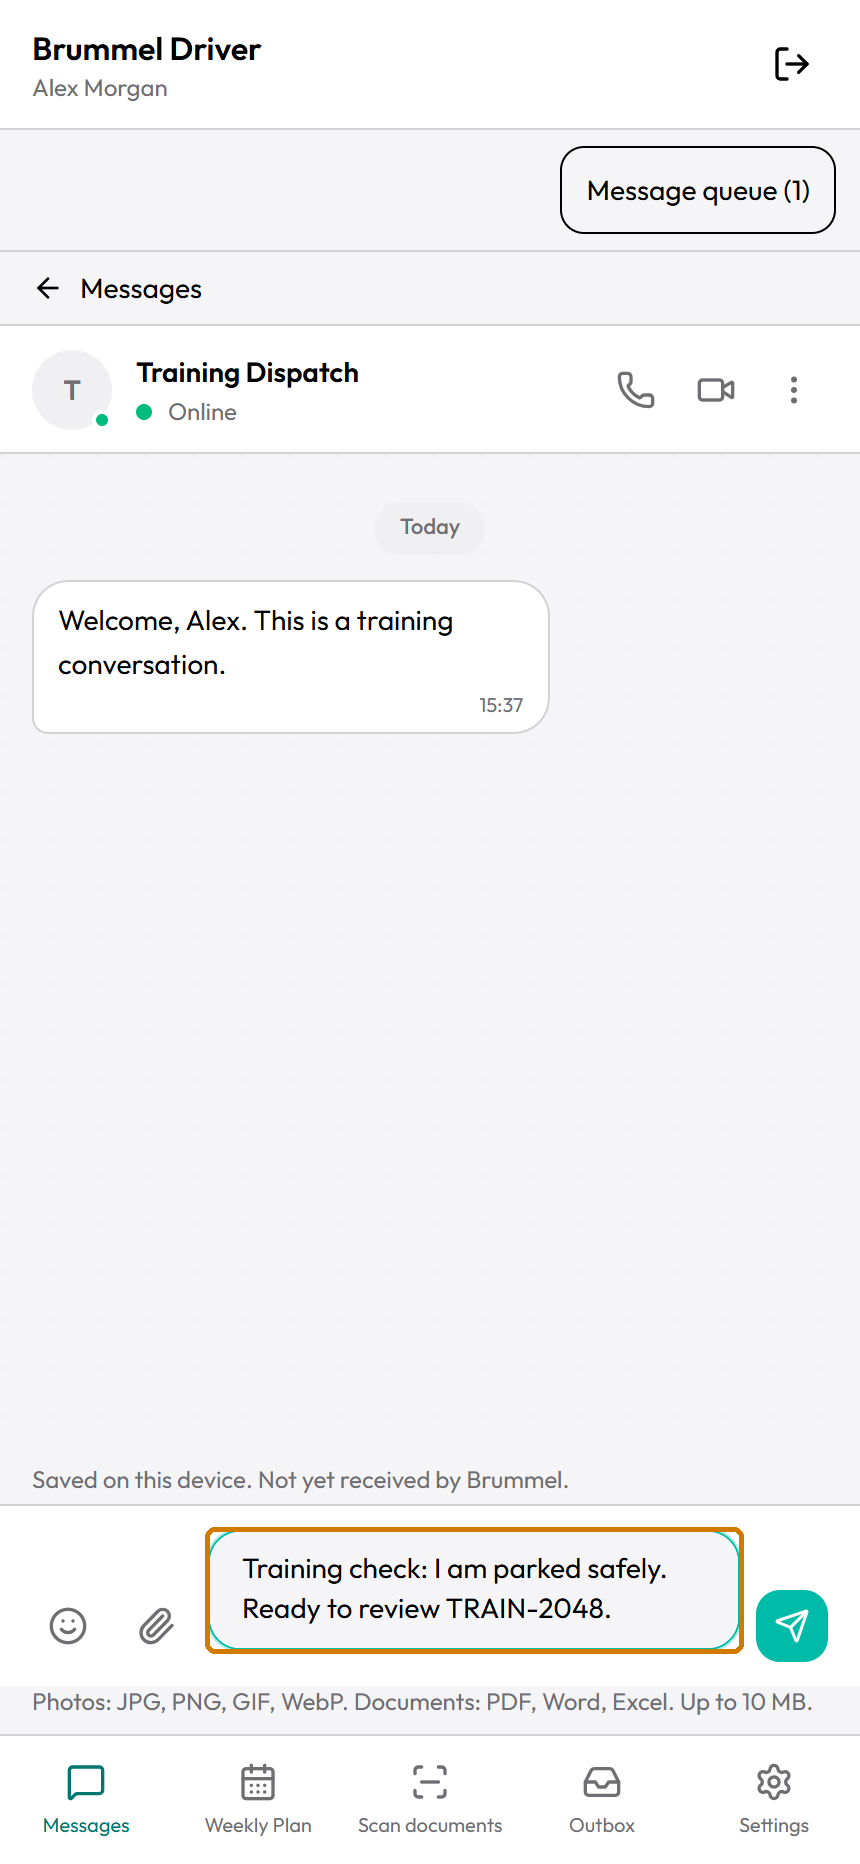
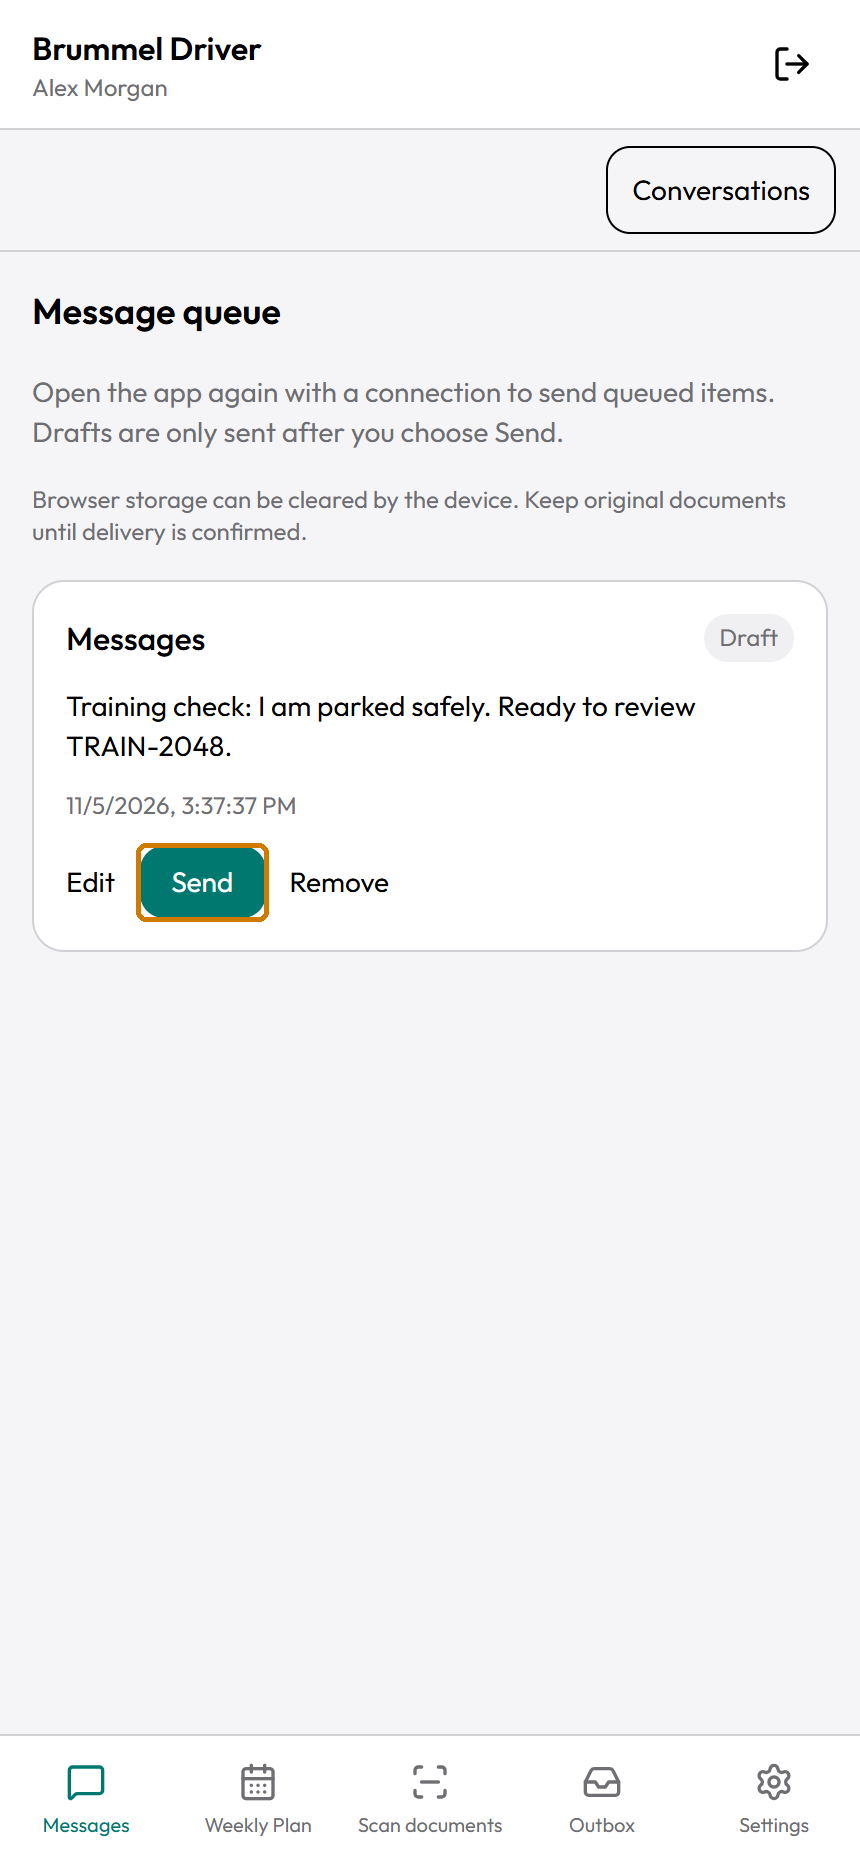
Saved on this device means the draft is local. It has not been received by Brummel.
Read the text once more. Tap Send when the recipient and the message are correct.
Tap Message queue in Messages to check pending work. Do not create another copy while delivery is being checked.
Keep Driver open with a connection. Once the message leaves the queue, tap Conversations.
Open the same conversation. You are done when your message appears there and is no longer pending.
The narration is AI-generated. The written steps teach the same task.
Follow these steps
Tap Type a message....The keyboard opens.Enter one clear message, then use the send arrow. Training example.
Enter your message.For training, use a clearly labeled sample message.
Correct any mistake in the text box.Tap where you want to change the text, then edit it.
Tap the smile icon if you want an emoji.The emoji choices open.
Tap the emoji you want.It is inserted in your draft.
Read your message once more.Check the recipient and the text.
Tap Send.The message is queued. An empty text box alone does not prove receipt.
Tap Message queue in Messages.A pending item may appear here. A completed item may already have left the queue.
Tap Conversations after the message is no longer pending.The conversation list returns.
Open the intended conversation.Check its name at the top.
Find the message you sent.The correct message appears in that conversation.
Message queue holds pending chat items on this device. Training example.
You are done when
Your message appears in the correct conversation and is no longer listed as pending in Message queue.
If something goes wrong
Saved on this device. Not yet received by Brummel. appears.This is a saved draft, not a delivered message. Choose Send when you are ready.
Waiting to send, Sending, or Checking delivery appears.Keep Driver open with a connection. Do not create a second copy.
Needs attention appears.Read the Message queue guidance. Use Retry only when it is offered for that item.
Keep in mind
Text drafts are saved on this device as you type. Browser storage can be cleared by the device. A saved draft is not a message received by Brummel.
To leave without sending, keep the text as a draft. Open Message queue in Messages later to edit, send, or remove it.
No pending messages. means this local message queue is empty. It does not say that someone has read the conversation.
TUTORIAL 05
Send and open photos or files
What you will do
Share a file in the correct conversation.
Before you start
Open the correct conversation.
Use only a file you are allowed to share.
Chat photos and documents must be no larger than 10 MB.
Watch this task
Read the video transcript
Send a photo or file
Send a photo or file only in the intended conversation. Check the name at the top first.
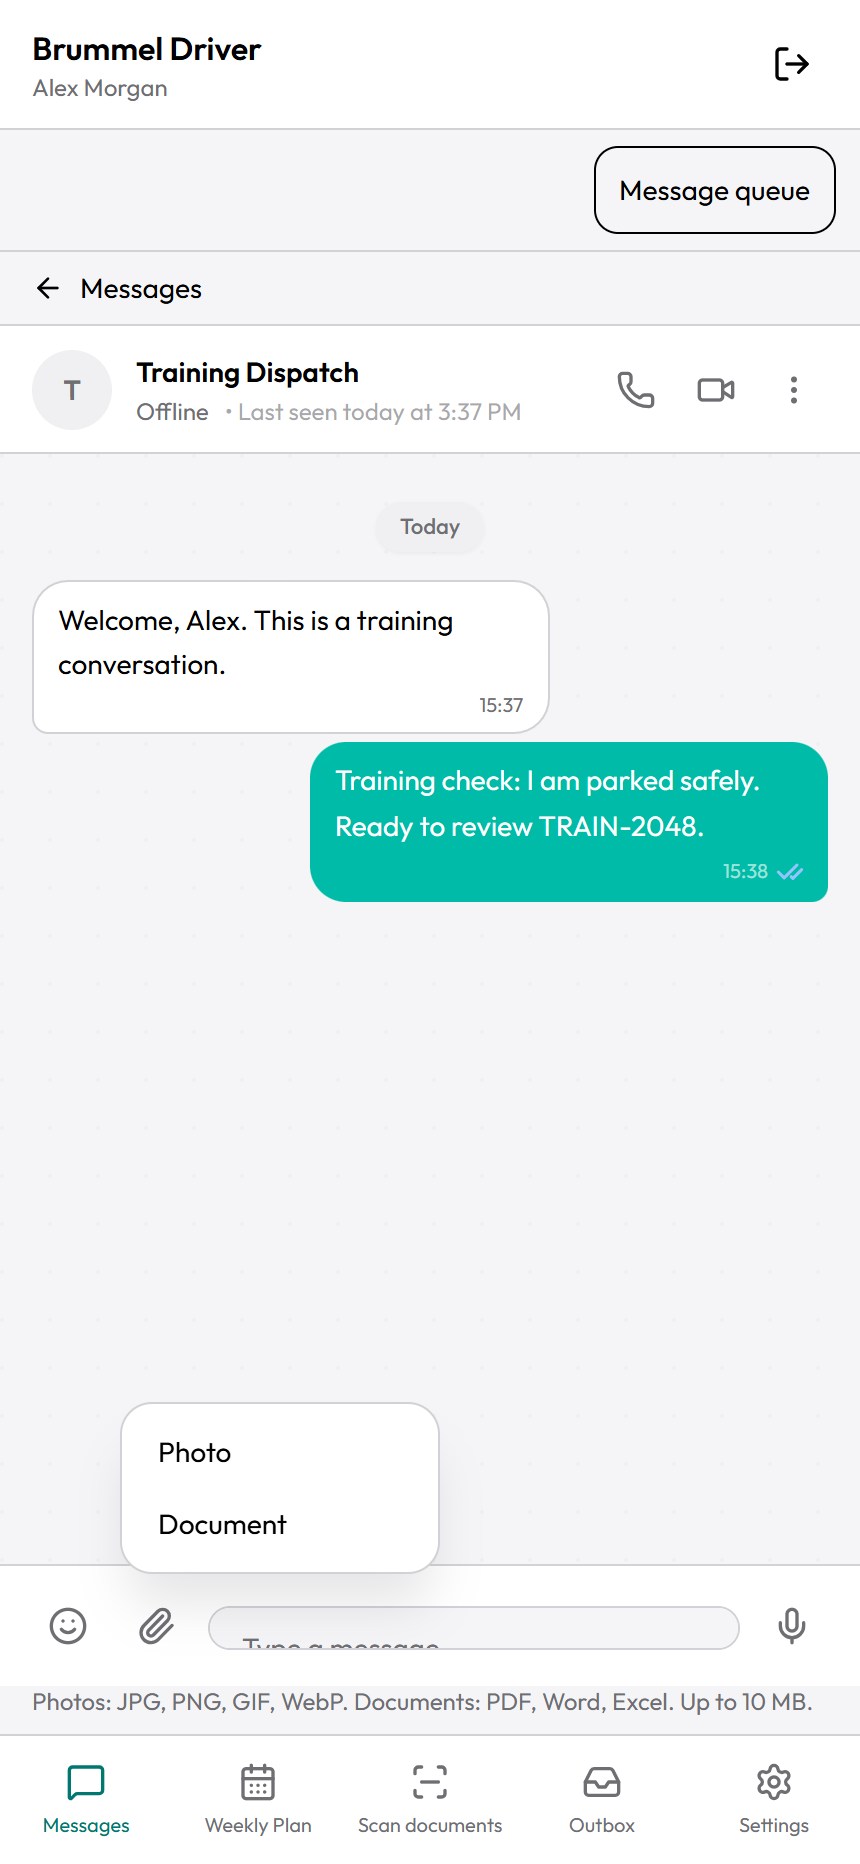
Tap the paperclip beside the message box. The menu offers Photo and Document.
Choose Photo for an image, or Document for a file. Your phone's file picker opens.
Choose the correct file. Chat attachments must be no larger than ten megabytes.
Choosing a file saves a draft. It does not finish delivery. Tap Message queue in Messages.
Check the attachment and its conversation. If it is wrong, remove the draft and choose the right file again.
Tap Send on the correct draft. Keep Driver open and connected while it sends.
When it leaves the queue, tap Conversations. Open the intended chat and check that the attachment appears.
Tap a received photo to enlarge it, or tap a document's file name to open it. Keep private files private.
The narration is AI-generated. The written steps teach the same task.
Follow these steps
Tap the paperclip icon beside the message box.Photo and Document appear.Choose the photo or document action in the conversation. Training example.
Tap Photo for an image, or Document for a file.Your phone's file picker opens.
Choose the file.Selecting it saves a local draft. It does not finish delivery.
Tap Message queue in Messages.Find the attachment draft.
Check the file-name text and attachment count.The queue does not preview the file. If you chose the wrong file, remove this draft and choose the correct file in the intended conversation.
Tap Send on the correct draft.Wait for its state to change.
Tap Conversations after the attachment leaves Message queue.The conversation list returns.
Open the intended conversation.Check that the attachment appears in this conversation.
To view a received photo, tap the image in the conversation.A larger image opens.
Tap the download icon if you need a copy.The browser may download the image or open it in another view.
Tap X to close the large image.The conversation returns.
To open a received document, tap its file name.A browser viewer or download opens. Private reports use the separate Private report viewer.
Return to Driver after viewing the file.Check the conversation name before sending another item.
Message queue holds pending chat items on this device. Training example.
You are done when
The attachment appears in the correct conversation and is no longer pending in Message queue, or the received file has opened successfully.
If something goes wrong
The file is rejected.Use JPG, PNG, GIF, or WebP for chat photos, or PDF, Word, or Excel for documents. Check the 10 MB limit.
The file did not send after you selected it.Open Message queue in Messages. File selection creates a draft that still needs Send.
The phone asks which app should open a file.Choose an app that supports that file type. For a PDF, use a PDF viewer.
Keep in mind
Use Scan documents for the guided BOL, POD, and lumper workflow. A file sent through a chat attachment is a separate action.
BOL means bill of lading. POD means proof of delivery.
TUTORIAL 06
Record and listen to voice messages
What you will do
Send a short voice note and use playback controls.
Before you start
Park safely.
Open the correct conversation.
Allow microphone access when your browser asks.
Watch this task
Read the video transcript
Send a voice message
Send a short voice message when speaking is easier than typing. Park safely and open the correct conversation.
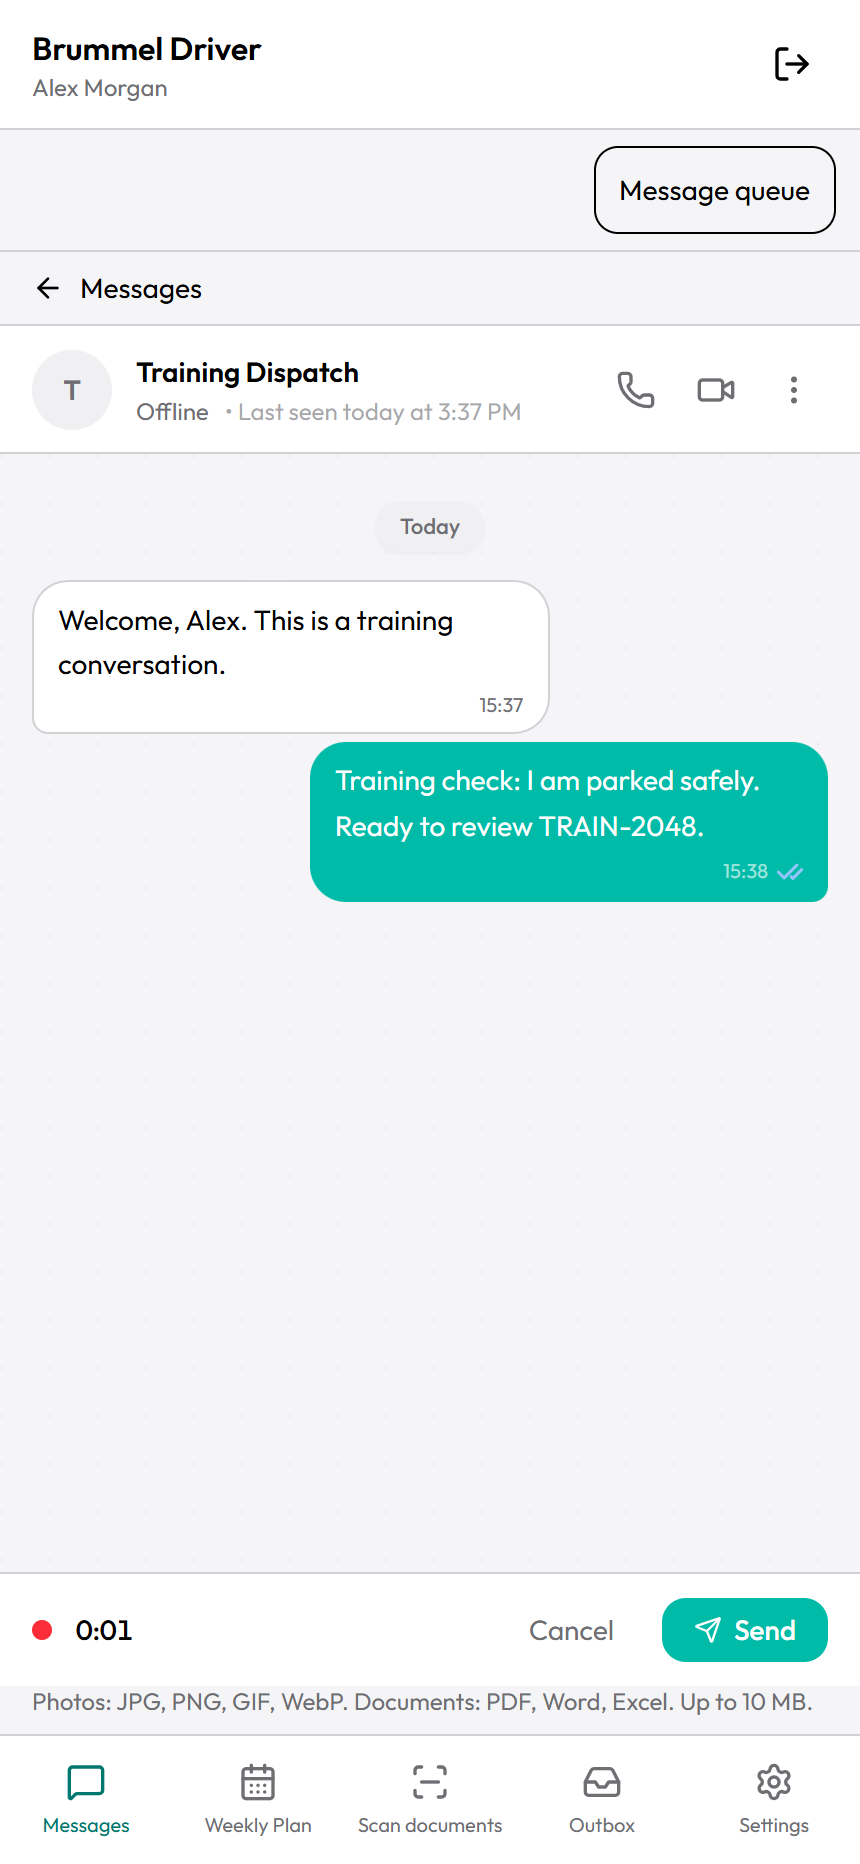
Make sure the text box is empty. Tap the microphone icon beside it.
Allow microphone access if the browser asks. The recording timer shows that recording has started.
Speak clearly. Tap Cancel if you want to discard this recording and start again.
Tap Send to finish recording. This first Send saves a voice draft in Message queue.
Open Message queue in Messages. Find the voice attachment and tap Send on that draft.
After it leaves the queue, open the intended conversation. Check that the voice message appears there.
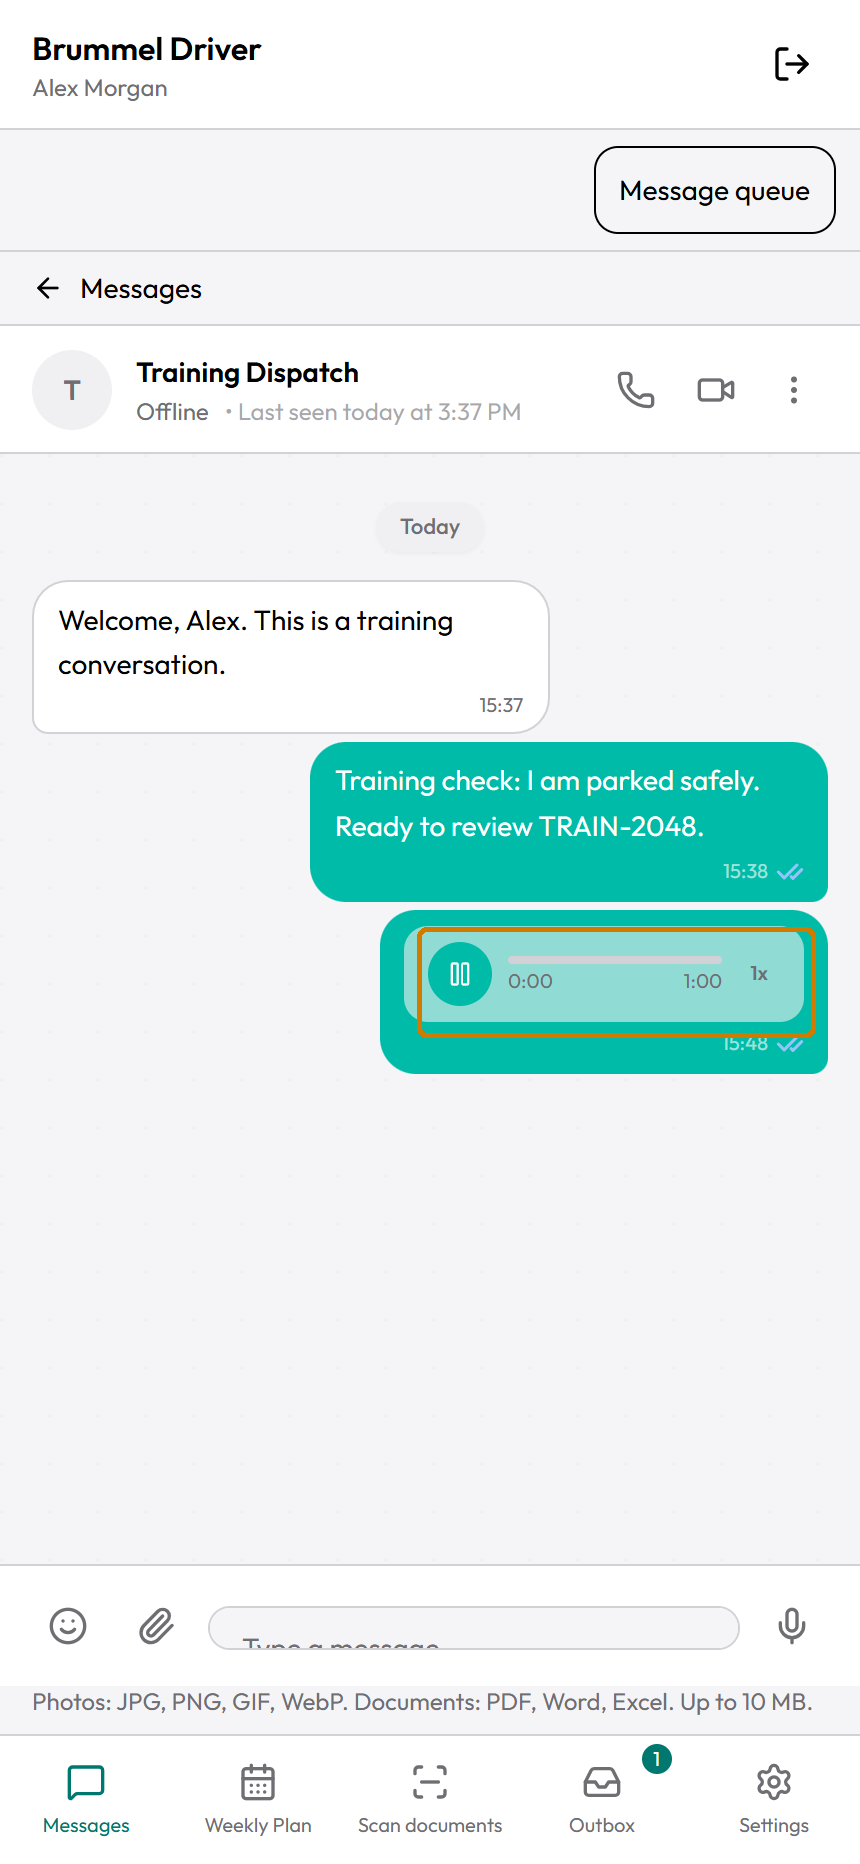
Tap the play triangle to listen. Tap pause to stop temporarily, or move the slider to replay a part.
Tap the speed button to cycle back to one times if playback is too fast. Check phone volume if sound is missing.
The narration is AI-generated. The written steps teach the same task.
Follow these steps
Make sure the text box is empty.The microphone icon appears instead of the text Send icon.
Tap the microphone.Recording starts and a timer appears.Use the recording controls to finish or cancel your voice message. Training example.
Allow microphone access if your browser asks.Recording requires microphone permission for the Driver website.
Speak clearly.Keep the phone close enough for your voice to be heard.
Tap Cancel if you want to discard this recording.The normal message box returns without saving the voice note.
Tap Send if you want to keep the recording.This saves the voice file as a draft in Message queue.
Tap Message queue in Messages.Find the new voice attachment.
Tap Send on that draft.The item enters the delivery process.
Tap Conversations after it leaves Message queue.The conversation list returns.
Open the intended chat.Check that the voice message appears.
To listen to a received note, tap its play triangle.The audio starts.Play a voice message. You can pause, seek, or change its speed. Training example.
Tap pause to stop playback temporarily.The audio pauses.
Tap play to continue listening.Playback resumes.
Move the small progress slider to replay part of the note.The elapsed time changes.
Tap 1x to change playback speed.The button cycles through 1.5x, 2x, and back to 1x.
You are done when
The voice note appears in the correct conversation and is no longer pending in Message queue, or you have heard the received note.
If something goes wrong
Recording does not start.Check the browser's microphone permission and try again. If another app is using the microphone, finish that task first.
You cannot hear playback.Check phone volume and Bluetooth output. Tap play again.
The note is too fast.Tap the speed button until it shows 1x.
Keep in mind
There are two Send actions for a voice note: keep the recording, then send its Message queue draft. Check the conversation after the second action.
TUTORIAL 07
Make, answer, and end a call
What you will do
Use the call controls in a direct conversation.
Before you start
Park safely.
Use a direct conversation with the intended person.
Keep a connection and allow microphone access. Video also needs camera access.
Watch this task
Read the video transcript
Make and end a call
Park safely before a call. Keep Driver open and connected. Use a direct conversation with the intended person.
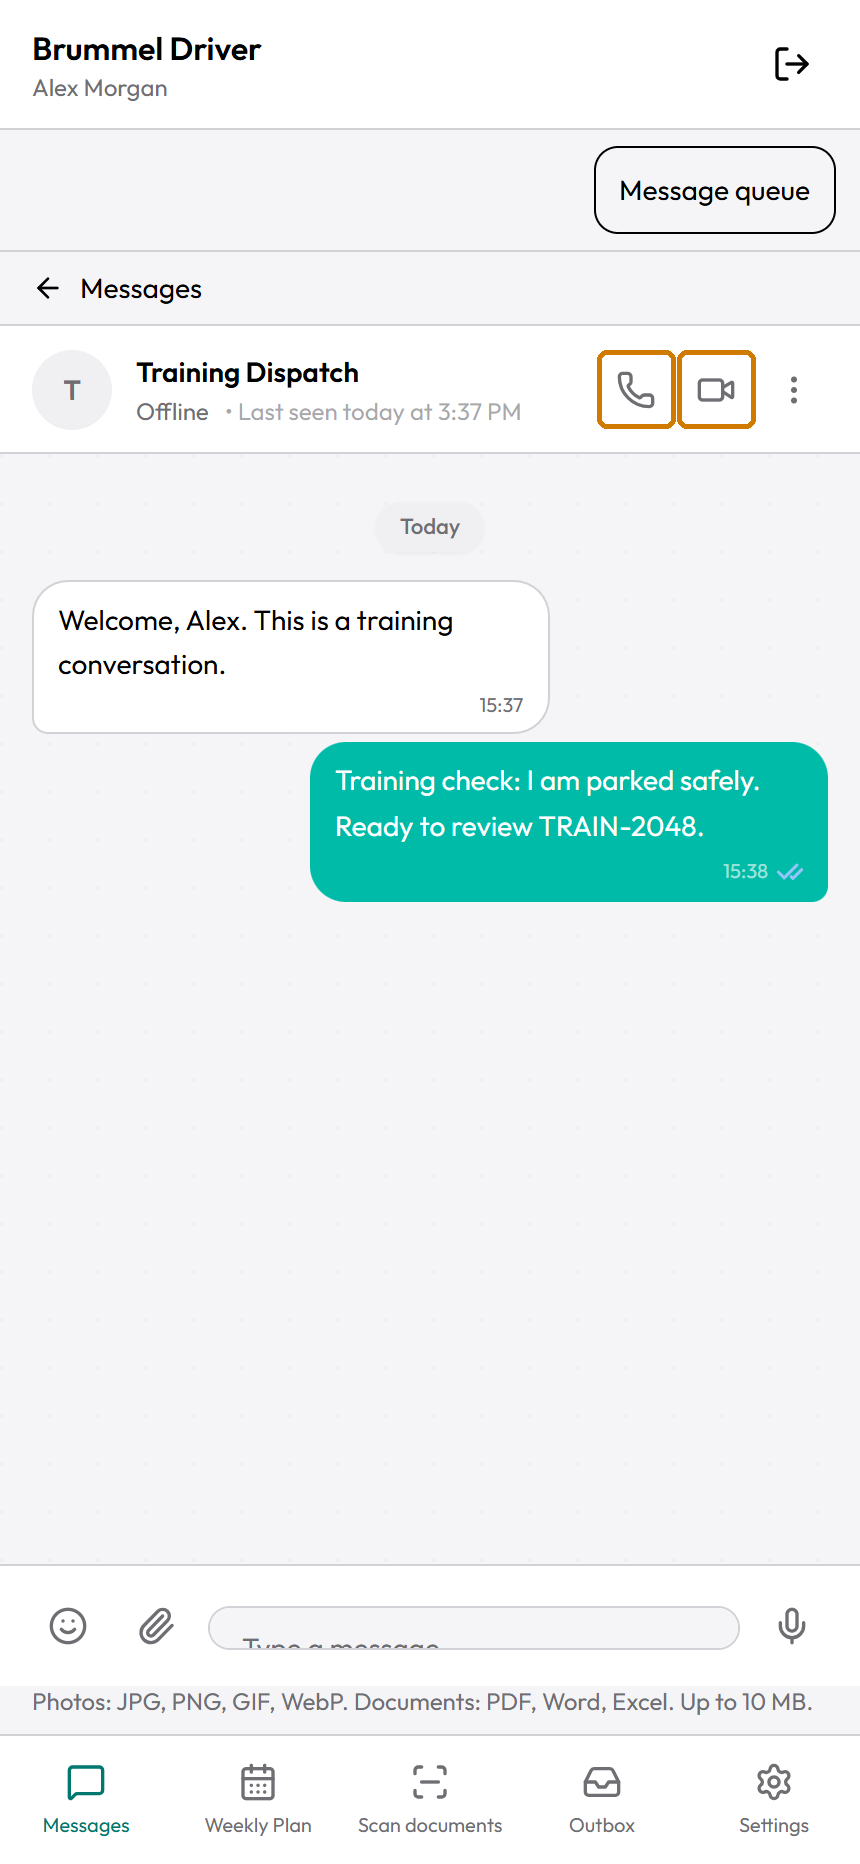
Check the person's name. Tap the phone icon for an audio call, or the camera icon for video.
Allow microphone access when asked. A video call also needs camera permission for the real Driver website.
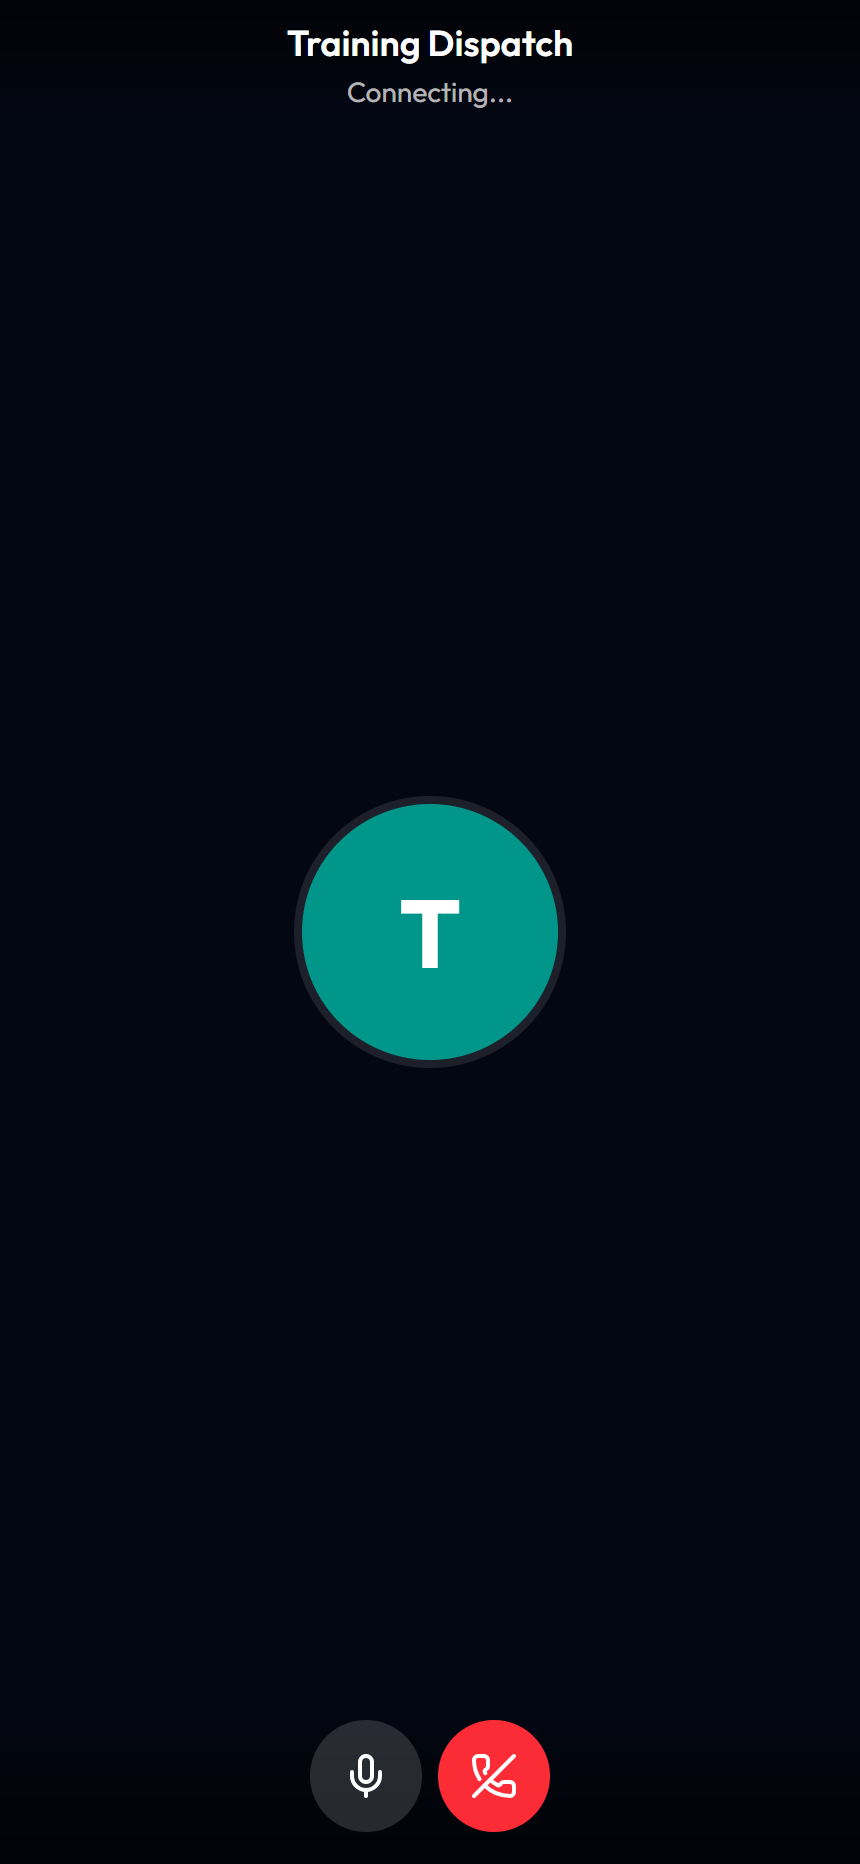
Wait while Ringing or Connecting appears. A running call timer indicates that the call is active.
Tap the microphone control to mute yourself. The crossed-out microphone shows that mute is on.
Tap it again to unmute. In a video call, the camera control turns your camera off or on.
Tap the red phone control when you want to end the call. Check that the conversation returns.
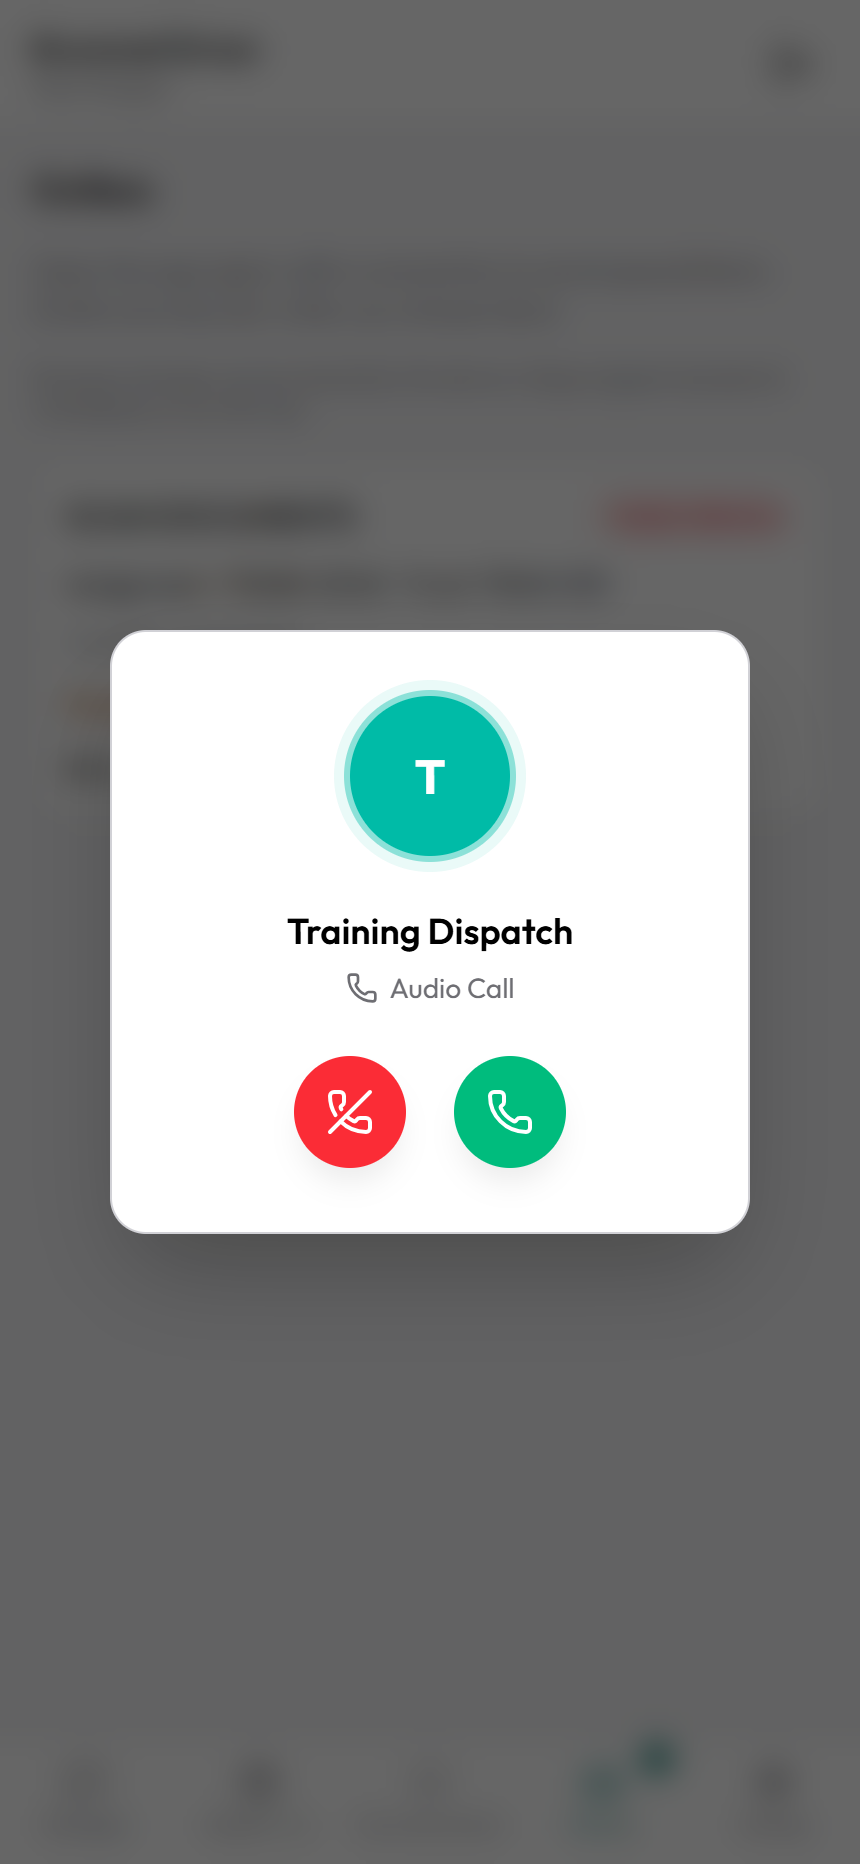
For an incoming call, check the caller's name. Use the green phone to answer, or the red phone to decline.
If audio is missing, check mute, volume, and Bluetooth. Do not rely on a closed or locked phone to ring.
The narration is AI-generated. The written steps teach the same task.
Follow these steps
Open the direct conversation.Check the person's name.The phone and video icons start calls with this contact. Training example.
Tap the phone icon for an audio call.For video, tap the camera icon instead.
Allow the requested microphone or camera permission.Only grant permission to the real Driver website.
Wait while Ringing... or Connecting... appears.A running call timer indicates an active call.
Tap the microphone control to mute yourself.The crossed-out microphone indicates mute.This call is still Connecting…. The microphone control mutes or unmutes; the red phone ends the call. Training example.
Tap the microphone again to unmute.The normal microphone icon returns.
During video, tap the camera control to turn your camera off or on.The camera icon changes.
Tap Switch camera during video if you need the other camera.The preview changes when your phone has an available second camera.
Drag your small video preview if it covers something you need to see.It stays inside the call area. On a keyboard, focus it and use arrow keys.
Tap the red phone control to end the call.The call ends and the conversation returns.
For an incoming call, check the caller's name.The incoming panel shows Audio Call or Video Call.Incoming audio call: the green phone answers; the red phone declines. Training example.
Tap the green phone to answer an incoming call.Wait for the active call screen and running timer.
Tap the red phone instead if you want to decline.The incoming call closes.
You are done when
The call timer ran while connected, and the call has ended after you tap the red phone.
If something goes wrong
The call button is unavailable.Your browser may not support calling or may lack media permission. Read any displayed explanation.
The call stays at Connecting....Check your connection. End the attempt if it does not connect, then use an existing approved contact method.
Audio is missing.Check mute, phone volume, and Bluetooth. Ask the other person to check their microphone too.
Could not switch camera. Check permissions and available cameras. appears.Check camera permission. Your device may have only one available camera. Continue with the current camera or end the call.
Keep in mind
Calls are shown only for direct conversations in Driver.
Do not rely on a locked phone, closed browser, or background app to ring. Keep Driver open for calls.
TUTORIAL 08
Add or change your Weekly Plan
What you will do
Record the dates and details of a plan.
Before you start
Connect to the internet.
Know the dates and times you need to enter.
Follow your actual Brummel arrangements. Saving a plan does not by itself prove business approval.
Watch this task
Read the video transcript
Add a Weekly Plan
Use Weekly Plan to record the dates and details of a plan. Connect to the internet before making changes.
Tap Weekly Plan. Use the week arrows to find the dates you need, then tap Add.
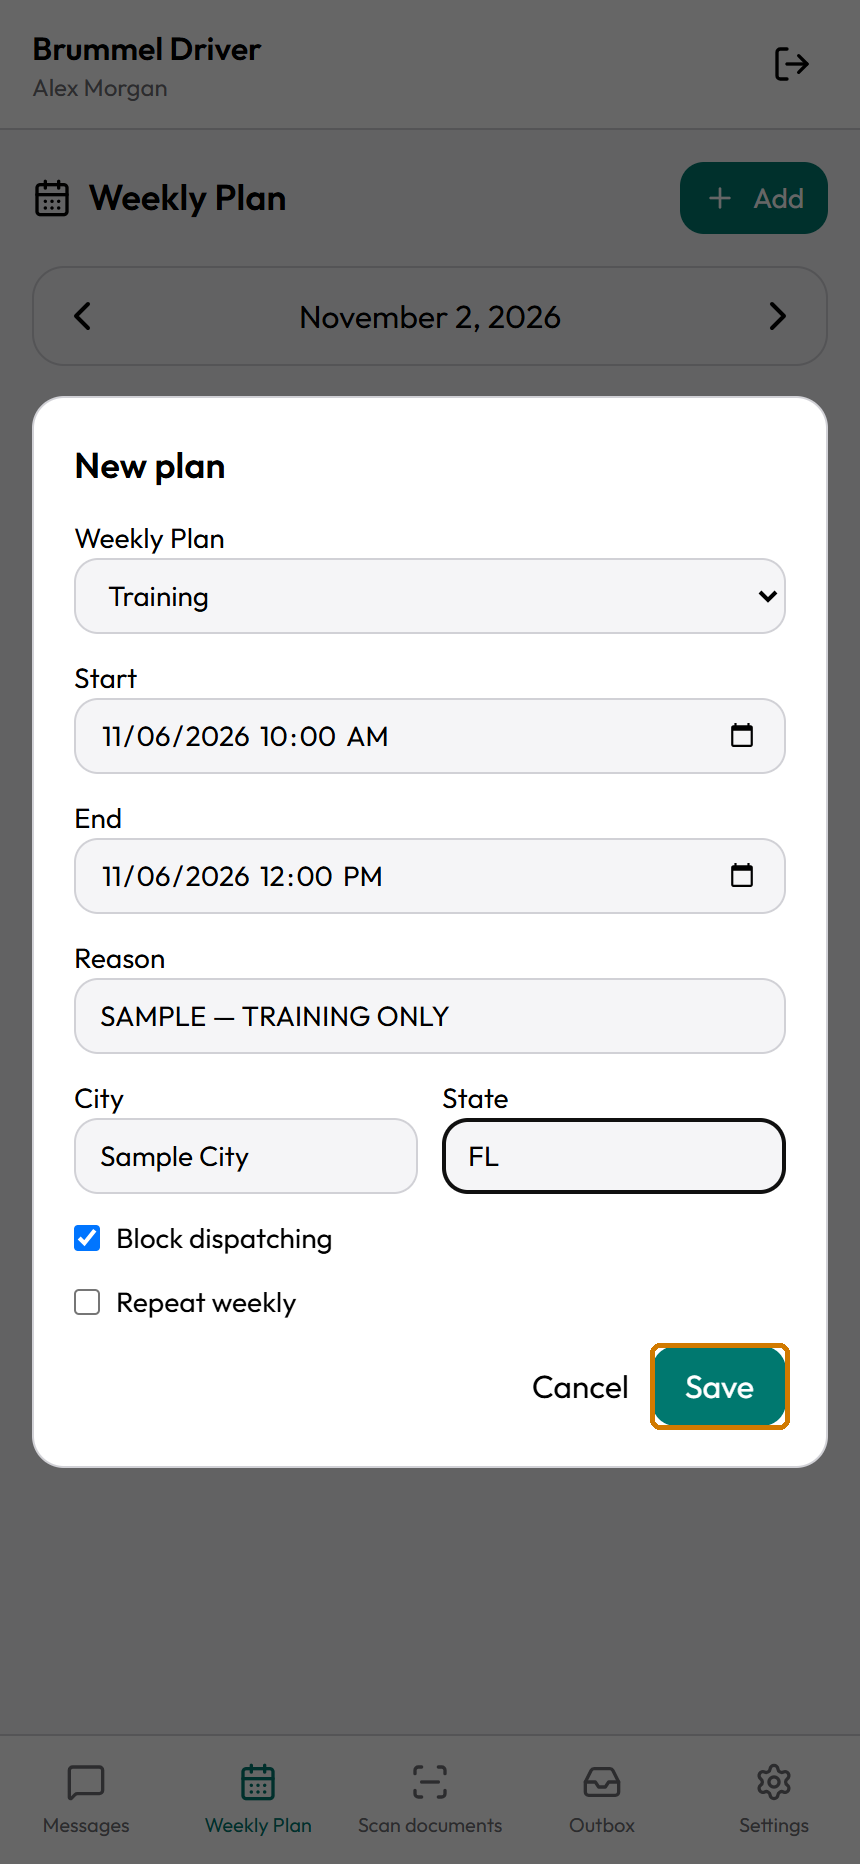
In New plan, choose the type that matches your plan. For example, choose Training for a training entry.
Set Start. Check both the date and the time before moving to the next field.
Set End after Start. If the app asks for a later end time, correct it before saving.
Enter a clear Reason if needed. Add City and State when they apply to this plan.
Check Block dispatching. Check Repeat weekly only if this plan should repeat. Review the dates once more.
Tap Save. When the list returns, check the saved entry's type, dates, times, and reason.
Use the pencil to correct an entry. Cancel leaves form changes unsaved. Saving a plan does not prove company approval.
The narration is AI-generated. The written steps teach the same task.
Follow these steps
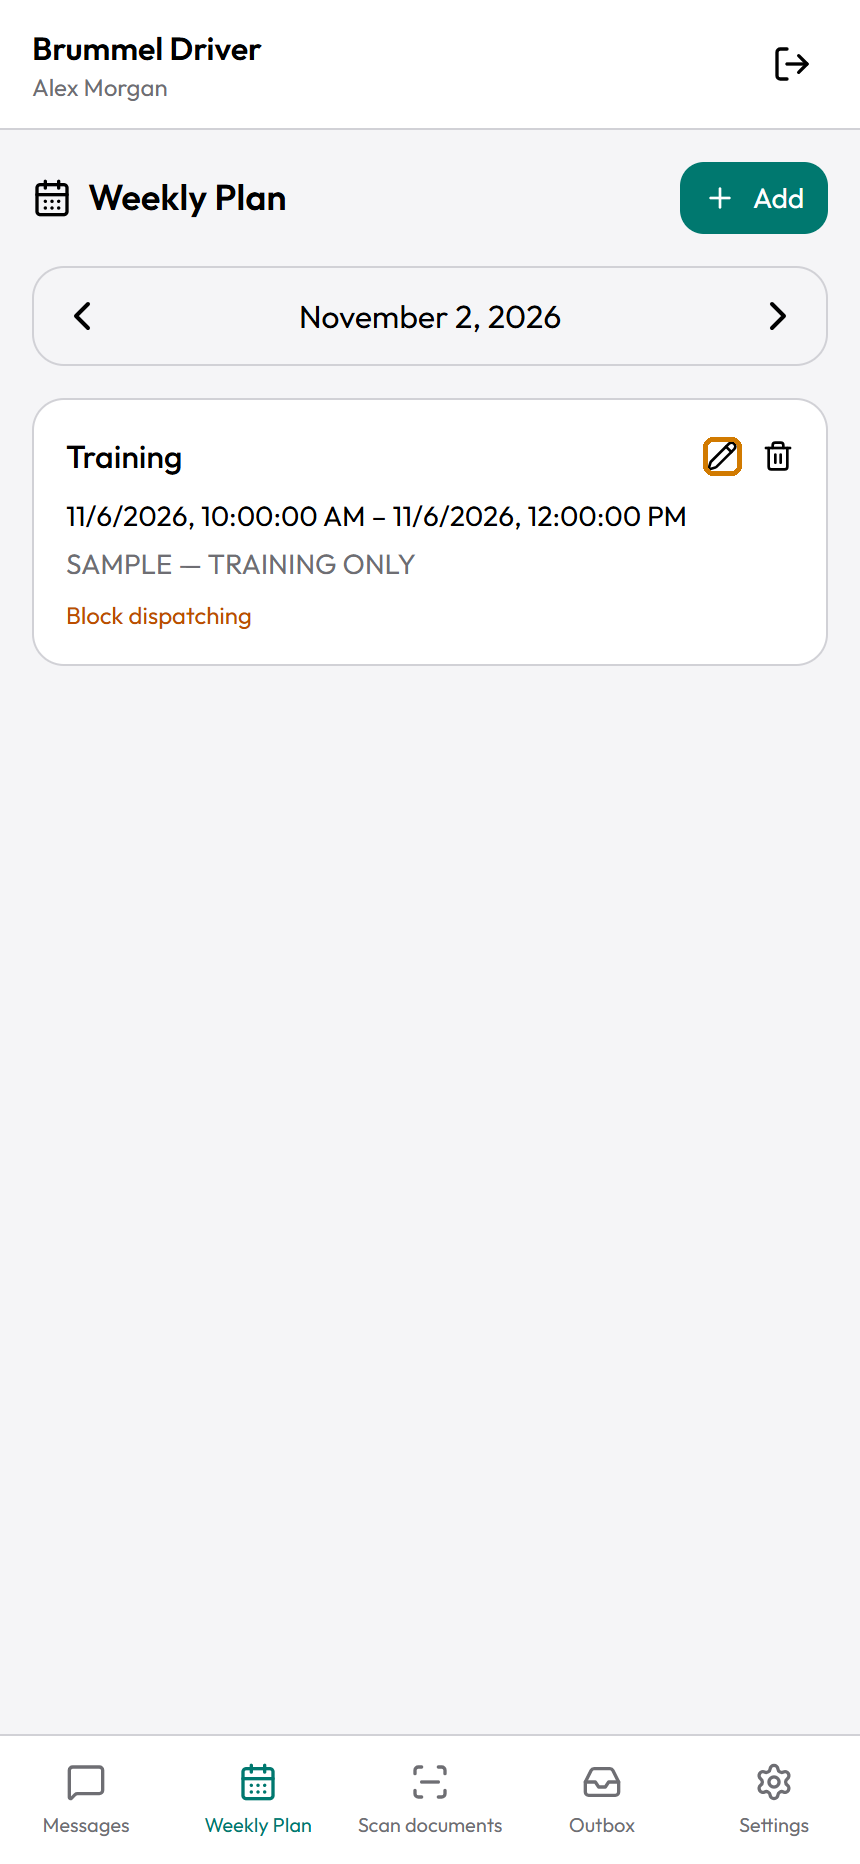
Tap Weekly Plan.The current week and its entries appear.Read the saved plan's dates and details. The pencil changes it. Training example.
Tap the left or right arrow to find the week you need.Check the date shown above the entries.
Tap Add.New plan opens.Enter the plan one field at a time. Check Start and End before Save. Training example.
Choose a type in the Weekly Plan field.Options include Home time, Vacation, Sick leave, Training, Maintenance, Weekly plan, and Other.
Set Start.Check both the date and the time.
Set End.Choose a date and time after Start.
Enter a Reason if needed.Use a short, clear explanation.
Enter City if it applies.Check the spelling.
Enter State if it applies.Use the location intended for this plan.
Check Block dispatching.This is selected for a new plan by default. Keep or change it to match the plan you intend.
Check Repeat weekly only if the plan should repeat.Leave it unchecked for a one-time plan.
Tap Save.The form closes and the plan list reloads.
Check the saved entry.Confirm the type, dates, times, and reason.
To correct an entry, tap its pencil icon.The edit form opens.
Change the field that needs correction.Check the value before saving.
Tap Save to submit the correction.Check the updated entry in the list.
To abandon form changes, tap Cancel.The form closes without submitting those changes.
To remove a plan, tap its trash icon.The app asks Remove this plan?.
Confirm only if you intend to remove it.Cancel the browser confirmation to keep it.
You are done when
The intended entry appears with the correct dates and details, or the removed plan no longer appears.
If something goes wrong
Choose an end time after the start. appears.Set End later than Start, then Save again.
The entry is not in the week you are viewing.Use the week arrows to open the entry's dates.
This action needs a connection. appears.Reconnect before adding, changing, or removing plans.
Keep in mind
For repeating entries, editing or removing an occurrence acts on the underlying repeating plan. Do not assume you are changing only one week.
The date/time picker is supplied by your phone. Its appearance may differ from the training image.
TUTORIAL 09
Scan a BOL, POD, or lumper receipt
What you will do
Create a readable document packet for the correct assignment.
Before you start
Park safely.
Have the correct paper document and any required seal and thermostat photos.
Connect so Driver can verify your assignment.
Keep every original until receipt is confirmed.
Watch this task
Read the video transcript
Scan and send a document
Park safely. Keep your original document. Tap Scan documents and check the correct assignment before you continue.
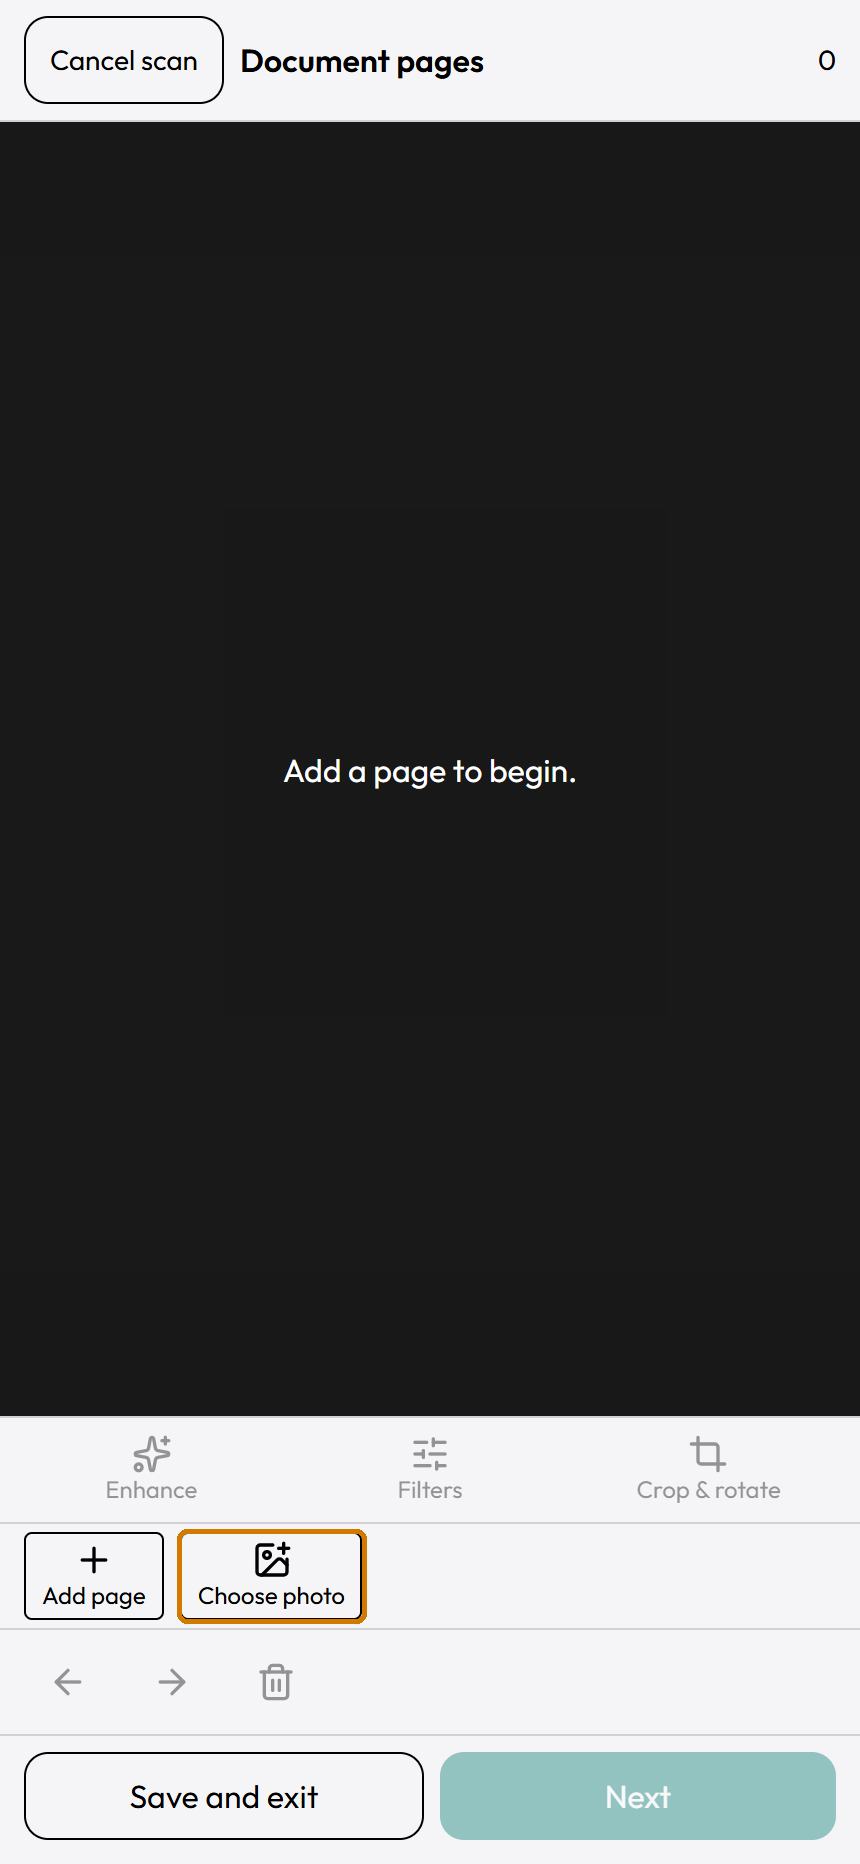
Tap Add page to use the camera. You can use Choose photo for an image already on your phone.
Keep the whole page visible, with readable text and no glare. Tap Capture page when you are ready.
Review the image in Edit document. Keep all text and signatures. Tap Apply to keep the page.
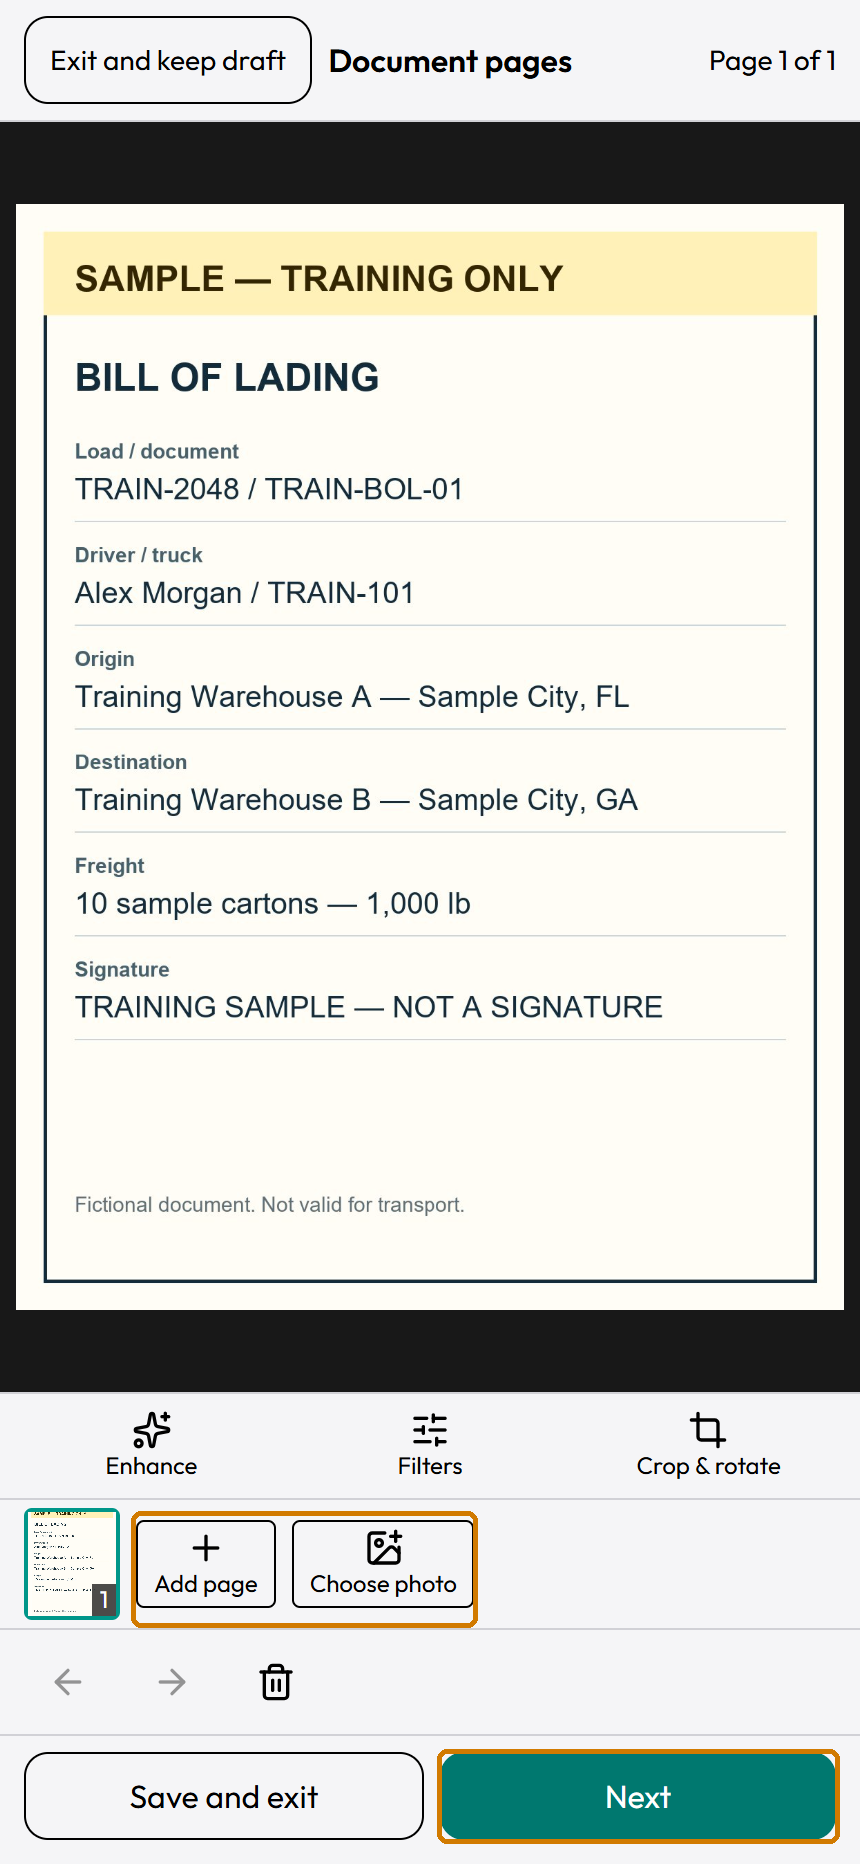
Add any remaining pages. Check the numbered thumbnails and page order. Tap Next when the pages are ready.
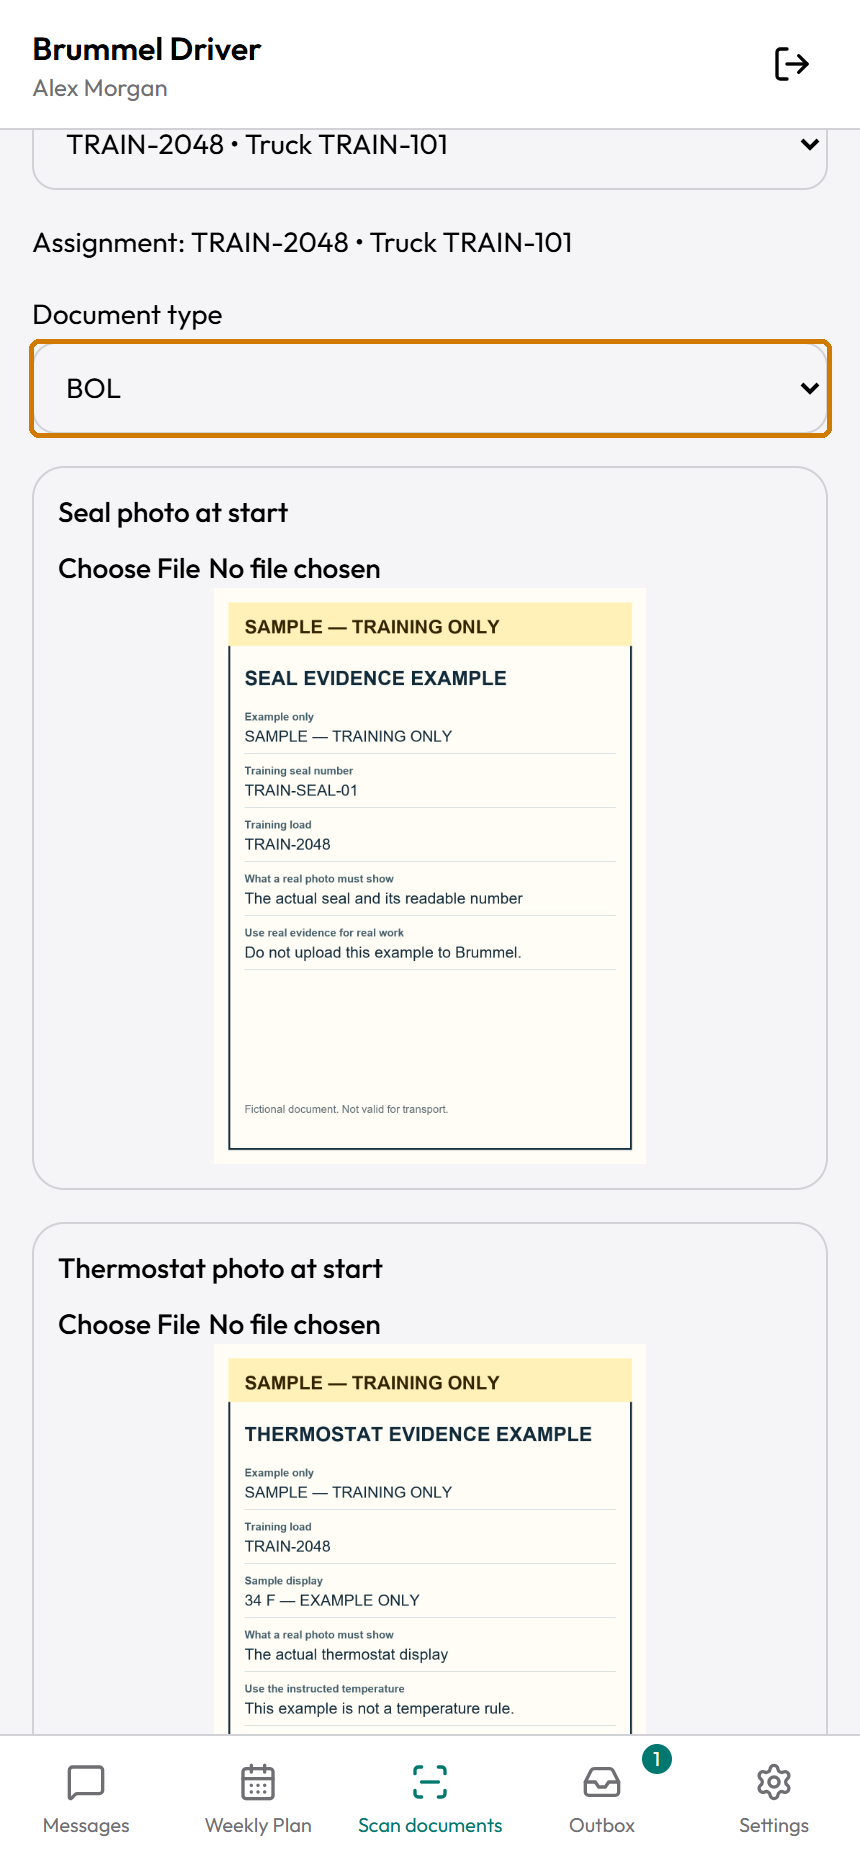
Check Assignment again. Choose Document type to match the bill of lading, proof of delivery, or lumper receipt.
Add the seal and thermostat photos requested for a bill of lading or proof of delivery. Check their previews.
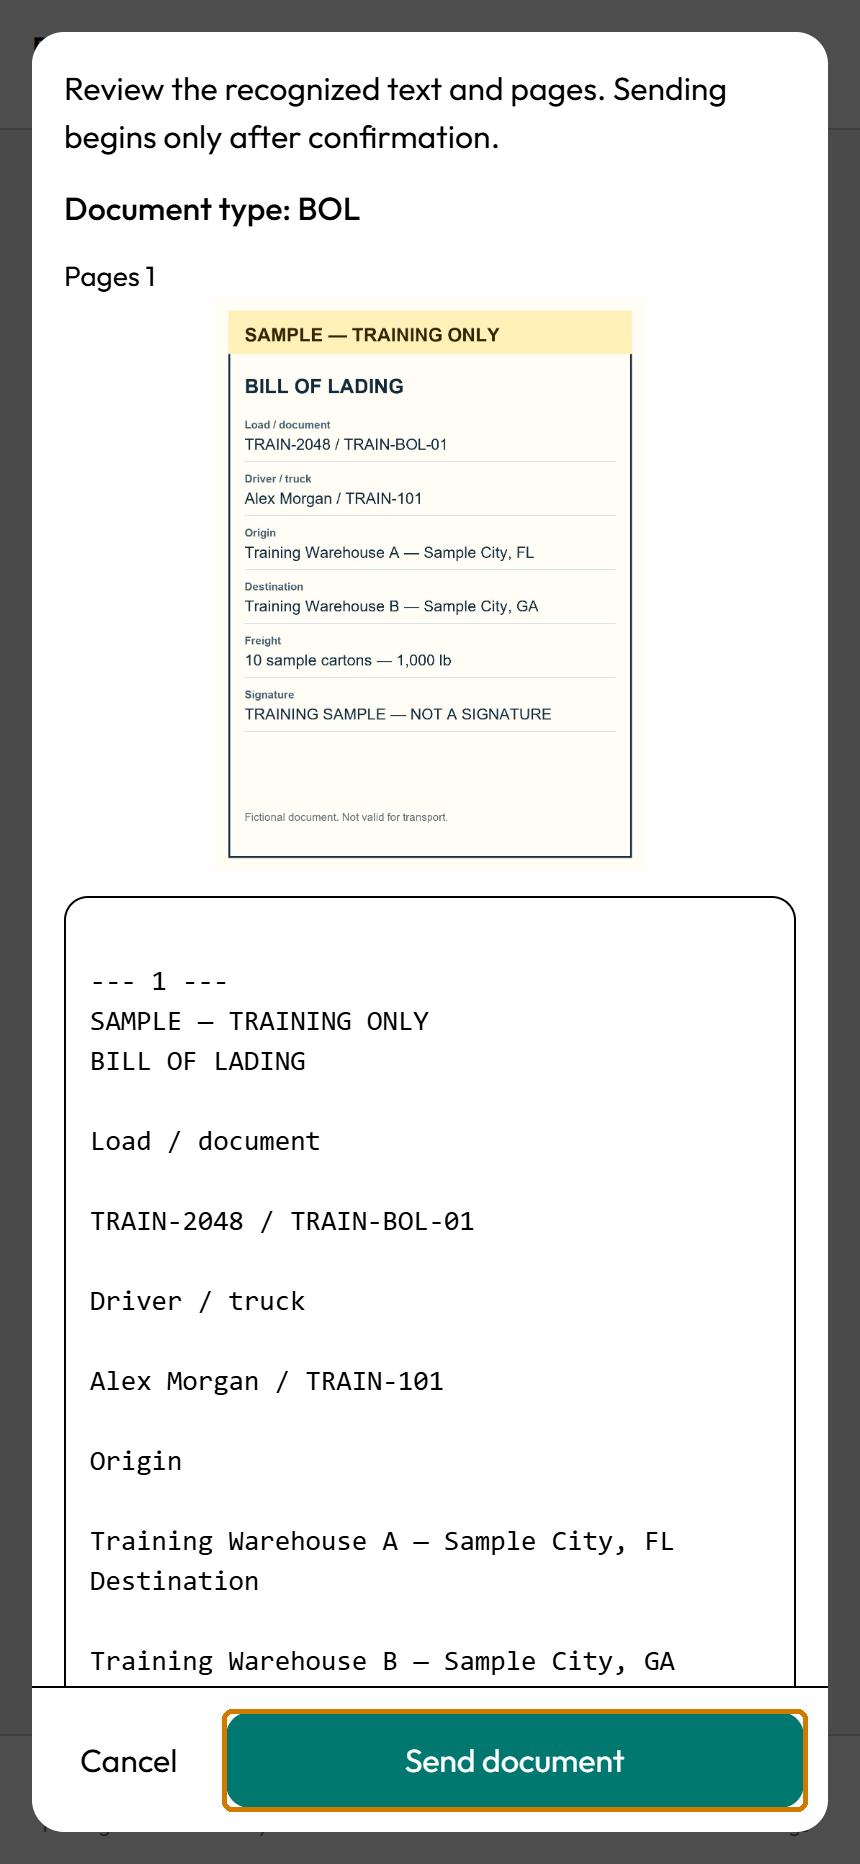
Tap Review and send. Wait for the review dialog. Check the page images and the recognized text.
Tap Cancel to correct a mistake. Tap Send document only when the packet and assignment are right.
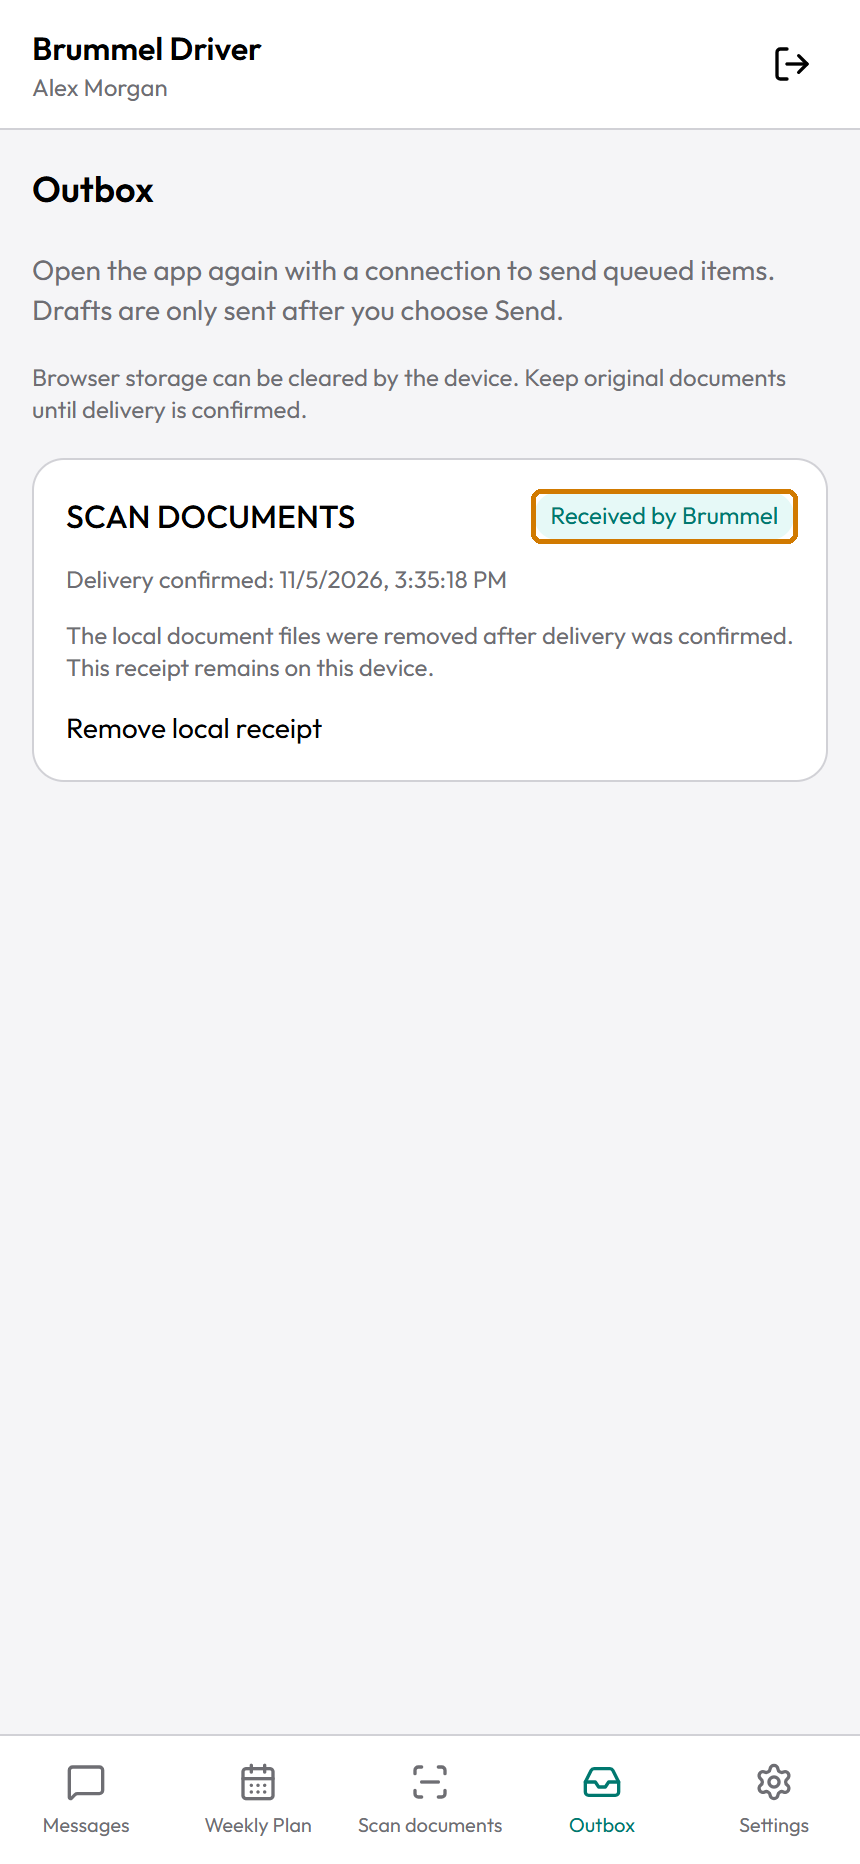
Outbox opens. Wait for Received by Brummel. That confirms receipt. It does not mean the office has approved the document.
The narration is AI-generated. The written steps teach the same task.
Follow these steps
Tap Scan documents.If one assignment is already selected, Document camera may open at once.
Close the camera if you need to review the assignment first.Document pages is visible. Page tools stay unavailable until a valid assignment is selected.
If Review assignment appears, tap it.The assignment details screen opens.
Choose the correct Assignment when a choice is shown.For this training, the fictional load is TRAIN-2048. Use your actual assigned load at work.
Tap Edit pages to return to Document pages if you are in the details screen.Page capture is available after a valid assignment is selected.
Tap Add page to open the camera.The title is Document camera.
Allow camera access if asked.Keep the entire page in view.
Place the page on a flat, well-lit surface.Keep all corners visible. Avoid glare, fingers over text, and dark shadows.
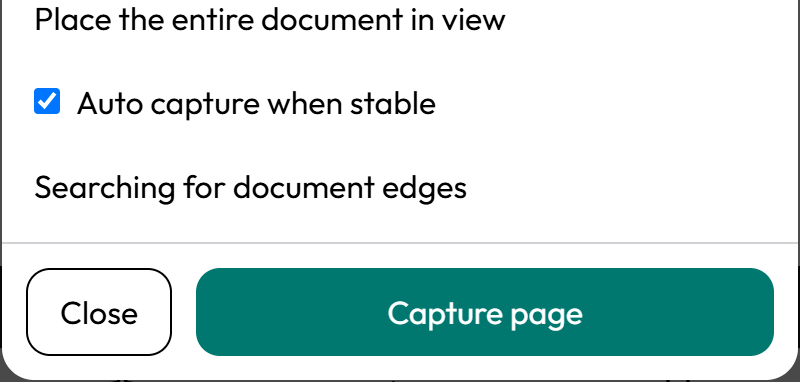
Turn on Auto capture when stable if you want automatic capture.Use this option only when it is available in Document camera.
Hold the phone still with the whole page in view.If automatic capture succeeds, Edit document opens with the captured page.
Tap Capture page if automatic capture has not taken the page.The captured page opens in Edit document.
To use an existing image instead, close the camera if it is open.Document pages is visible.
Tap Choose photo.Your phone opens its image picker.
Choose the image.Each selected image opens in Edit document for review.
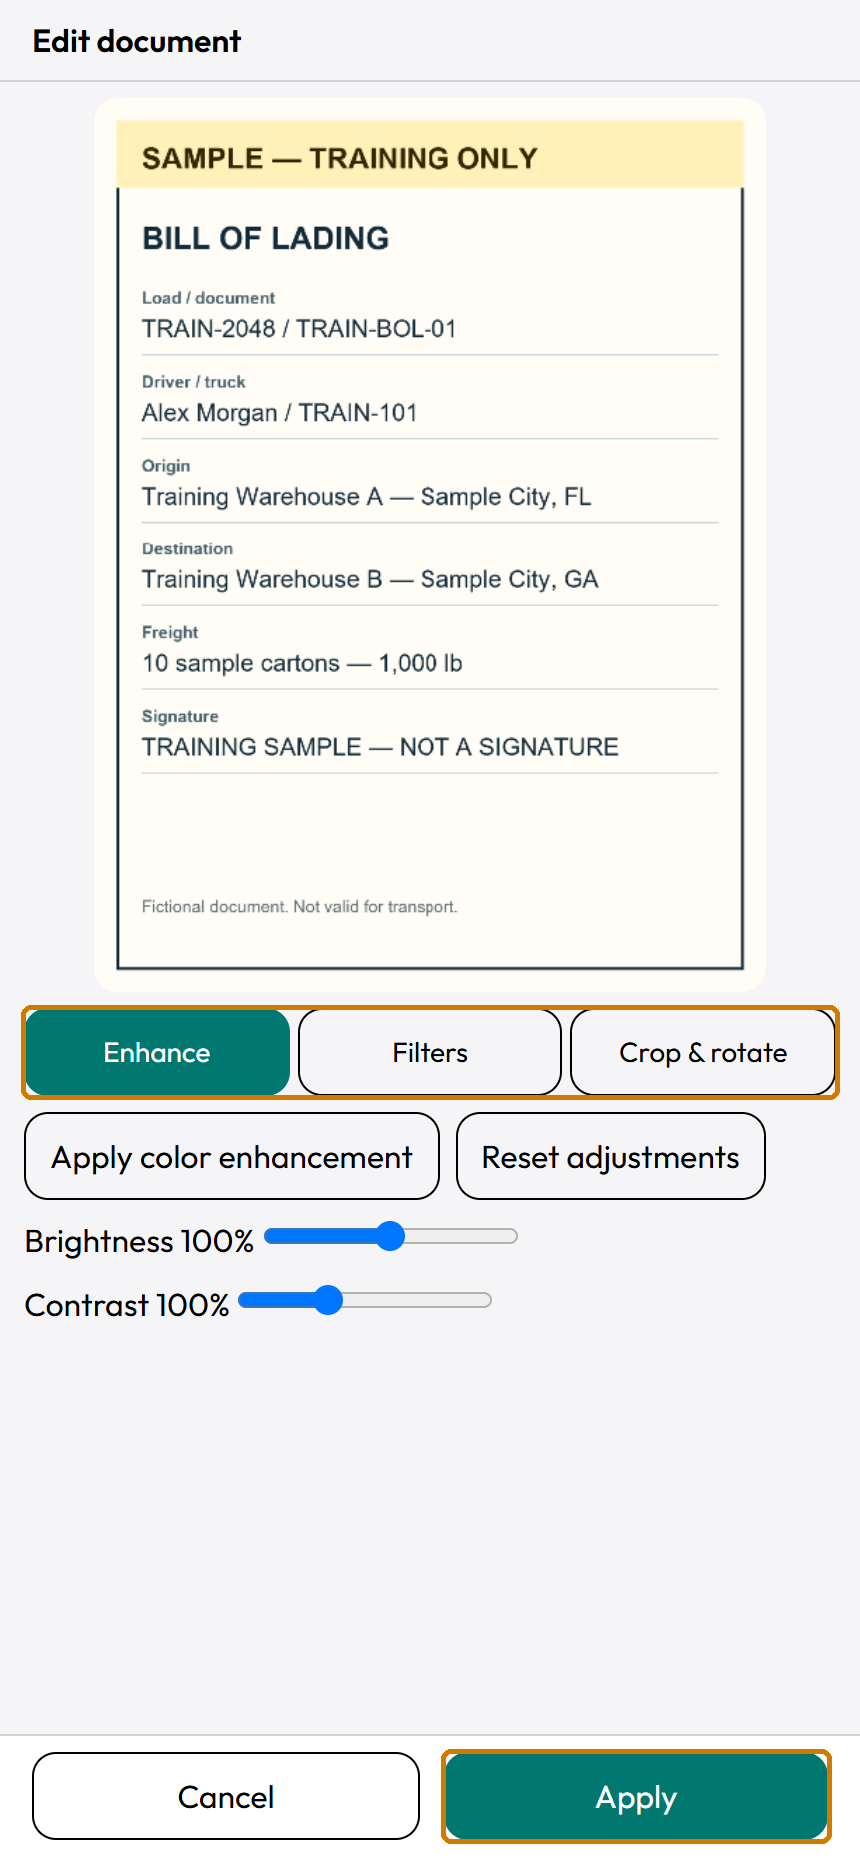
Check the image in Edit document.Read the important text and check that no part of the page is missing.
Tap Apply to keep the page.The page appears in Document pages.
Tap Add page or Choose photo for each additional page.Repeat the image review. Check the page count.
Tap a thumbnail to select a page.The large preview changes to the selected page.Select a page thumbnail to work on that page. Check the order before Next. Training example.
Use Move page earlier or Move page later if the order is wrong.The small numbered thumbnails show the new order.
To remove an unwanted page, tap its trash icon.Read Remove this page only from this draft? and confirm only for that page.
Tap Next when the pages are ready.The assignment and document details screen opens.
Check Assignment again.Stop if the selected load is not the one shown on the document.
Choose Document type.Choose the offered BOL, POD, or Lumper receipt that matches your document.Check Assignment and Document type. Add the exact evidence requested. Training example.
For BOL, add Seal photo at start.Check that the required image preview appears.
For BOL, add Thermostat photo at start.Check that the temperature display is readable.
For POD, add Seal photo at end.Use the end-of-trip evidence requested on this screen.
For POD, add Thermostat photo at end.Lumper receipt does not show these seal and thermostat requirements.
Tap Review and send.Driver prepares the document and recognizes text locally.
Wait for the review dialog.The recognized text and page images appear. Sending has not started yet.
Review the recognized text and page images.Check that this is the intended document for the selected assignment.
Tap Cancel if you need to correct the pages, assignment, or type.Make the correction, then use Review and send again.
Tap Send document when the packet is correct.Driver verifies the current assignment, queues the document, and opens Outbox.
Check the document in Outbox.Wait for Received by Brummel. Do not submit a duplicate while delivery is being checked.
Document pages is empty. Add page opens the camera; Choose photo selects a saved image. Training example.Camera controls: Auto capture when stable is optional. Capture page takes a manual picture. Close returns to the document. Training example.Use Enhance, Filters, or Crop & rotate in Edit document. Apply keeps the adjustment. Training example.Review the prepared document before choosing Send document. Training example.
You are done when
The correct document packet shows Received by Brummel in Outbox. This confirms receipt, not a separate office approval.
If something goes wrong
The camera is unavailable.Check camera permission or use Choose photo. If the camera stopped while the app was in the background, reopen it.
No authorized recipients are available. Contact dispatch. appears.Stop this submission and contact your existing dispatcher. Do not choose an unrelated assignment.
The app asks you to review the assignment and document type.Check the current assignment again. It may have changed since you began.
The app says required seal and thermostat photos are missing.Add the specific images shown for the chosen document type.
Text recognition failed. Use a PDF without searchable text? appears.Cancel to retry with clearer pages. If you accept the fallback, the PDF keeps the page images without searchable text. Review every image before Send document.
The document is too large.Use fewer unnecessary pages or smaller clear images. A selected image can be up to 20 MB, a document up to 30 pages, and the assembled PDF up to 15 MB.
This draft changed in another tab. Reopen the draft before continuing. appears.Stop editing this copy. Open Outbox and reopen the latest draft.
Keep in mind
BOL means bill of lading. POD means proof of delivery. A lumper receipt records an unloading charge; choose it only when it matches your document.
The camera's Auto capture when stable option is optional. If automatic capture is unavailable, use Capture page.
Changing Document type can remove the auxiliary seal and thermostat photos while keeping document pages. Read the warning before confirming.
The review text can contain recognition errors. The actual page images must remain clear and complete.
TUTORIAL 10
Make scanned pages clear and keep or discard a draft
What you will do
Adjust a page without losing the information on it.
Before you start
Open a draft in Scan documents.
Select the page you want to change.
Keep the original document available.
Follow these steps
Tap Enhance, Filters, or Crop & rotate below the selected page.Edit document opens.
Tap Enhance to open its adjustments.Enhancement controls appear.
Tap Apply color enhancement if you want to try it.Keep the result only if the text is easier to read.
Adjust Brightness only as needed.Keep both light and dark text visible.
Adjust Contrast only as needed.Do not make faint text disappear.
Tap Filters.Color, Grayscale, and Document are available.
Choose the filter with the clearest text and markings.Check that faint details remain readable.
Tap Crop & rotate to straighten the page.Four corner handles mark the area to keep.
Drag a corner handle to the matching paper corner.Repeat for the other corners. Do not cut off text, signatures, or stamps.
Drag a side handle when you need to move a whole edge.Check the full page boundary.
Tap Suggest edges if you want Driver to look for the document edges.If no edges are found, adjust the handles yourself.
Tap Full image to restore the full image boundary.Use this if the suggested crop removes information.
Tap Rotate until the text is upright.Check the preview after each tap.
Tap Reset adjustments if you want to start the image adjustment again.Check the preview before continuing.
Tap Apply to keep the changes.The edited page returns to Document pages.
Tap Cancel in Edit document if you do not want those image changes.During an import, Cancel skips that image and continues with any remaining images.
Tap Save and exit in Document pages to keep the current draft.Outbox opens. The document is still a Draft.
To continue later, tap Outbox.Find the saved document Draft.
Tap Edit on the draft.The scanner opens. Check the assignment before sending.
For a new scan you do not need, tap Cancel scan.Read the discard warning. Confirming removes this scan and its pages.
When editing an existing draft, use Exit and keep draft if you want to leave.Read the confirmation. Changes already saved remain in that draft.
Use Enhance, Filters, or Crop & rotate in Edit document. Apply keeps the adjustment. Training example.Select a page thumbnail to work on that page. Check the order before Next. Training example.
You are done when
Your edited pages are readable and ordered, or the draft is intentionally saved or discarded.
If something goes wrong
The crop handles do not outline the paper.Tap Full image and place the corners again. Do not Apply a crop that removes required information.
The page remains blurry after enhancement.Capture a new, clearer photo. Brightness and filters cannot restore missing detail.
You are unsure whether you saved or sent.Open Outbox. Draft means not sent. Received by Brummel means receipt confirmed.
Keep in mind
Page edits are saved as you apply them. Leaving an existing draft does not undo changes already saved.
A good document photo includes all edges, upright readable text, and required signatures. Every sample in this package is marked SAMPLE — TRAINING ONLY.
TUTORIAL 11
Check delivery and fix pending work
What you will do
Tell a saved draft from an item Brummel has received.
Before you start
Use the same account, device, and browser where you created the item.
Keep a connection and leave Driver open while sending.
Watch this task
Read the video transcript
Check document delivery
Use the bottom Outbox tab for scanned documents. Pending chat messages are in Messages, under Message queue.
Find your document. Check its assignment, document type, and time before you take any action.
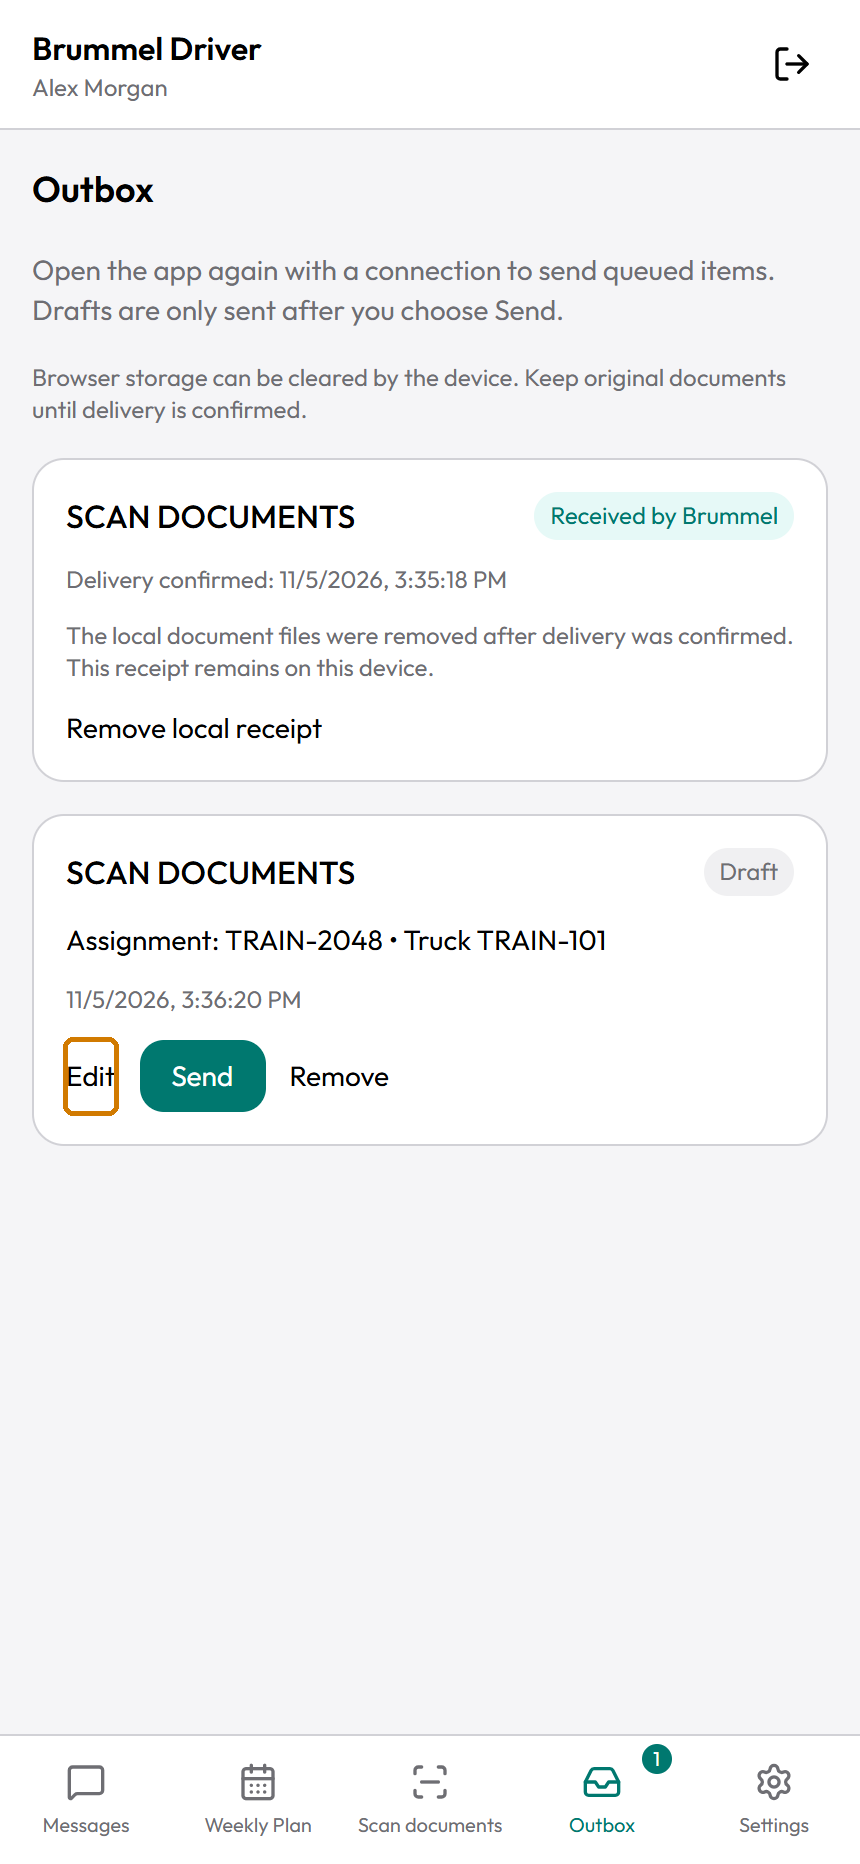
Draft means saved on this device and not sent. Tap Edit if its pages or details need a correction.
Tap Send on the draft to reopen the scanner. Review its pages and assignment.
Use Review and send. Tap Send document when the packet is correct. Keep Driver open and connected.
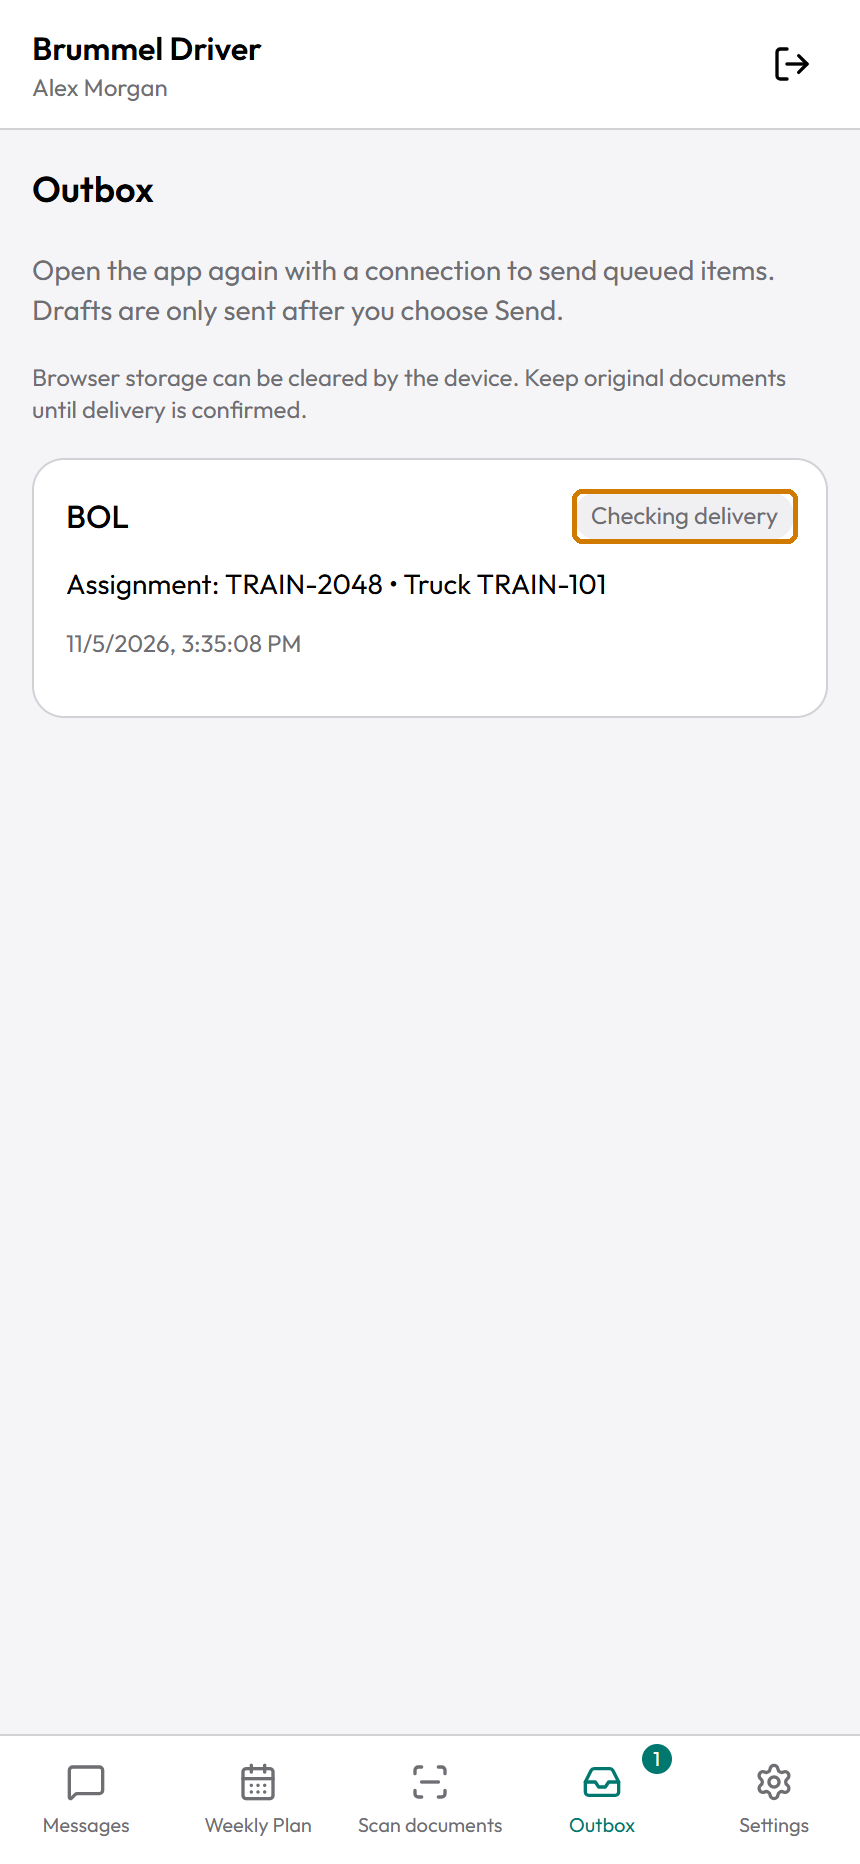
Waiting to send, Sending, and Checking delivery are pending states. Do not make a second copy while they appear.
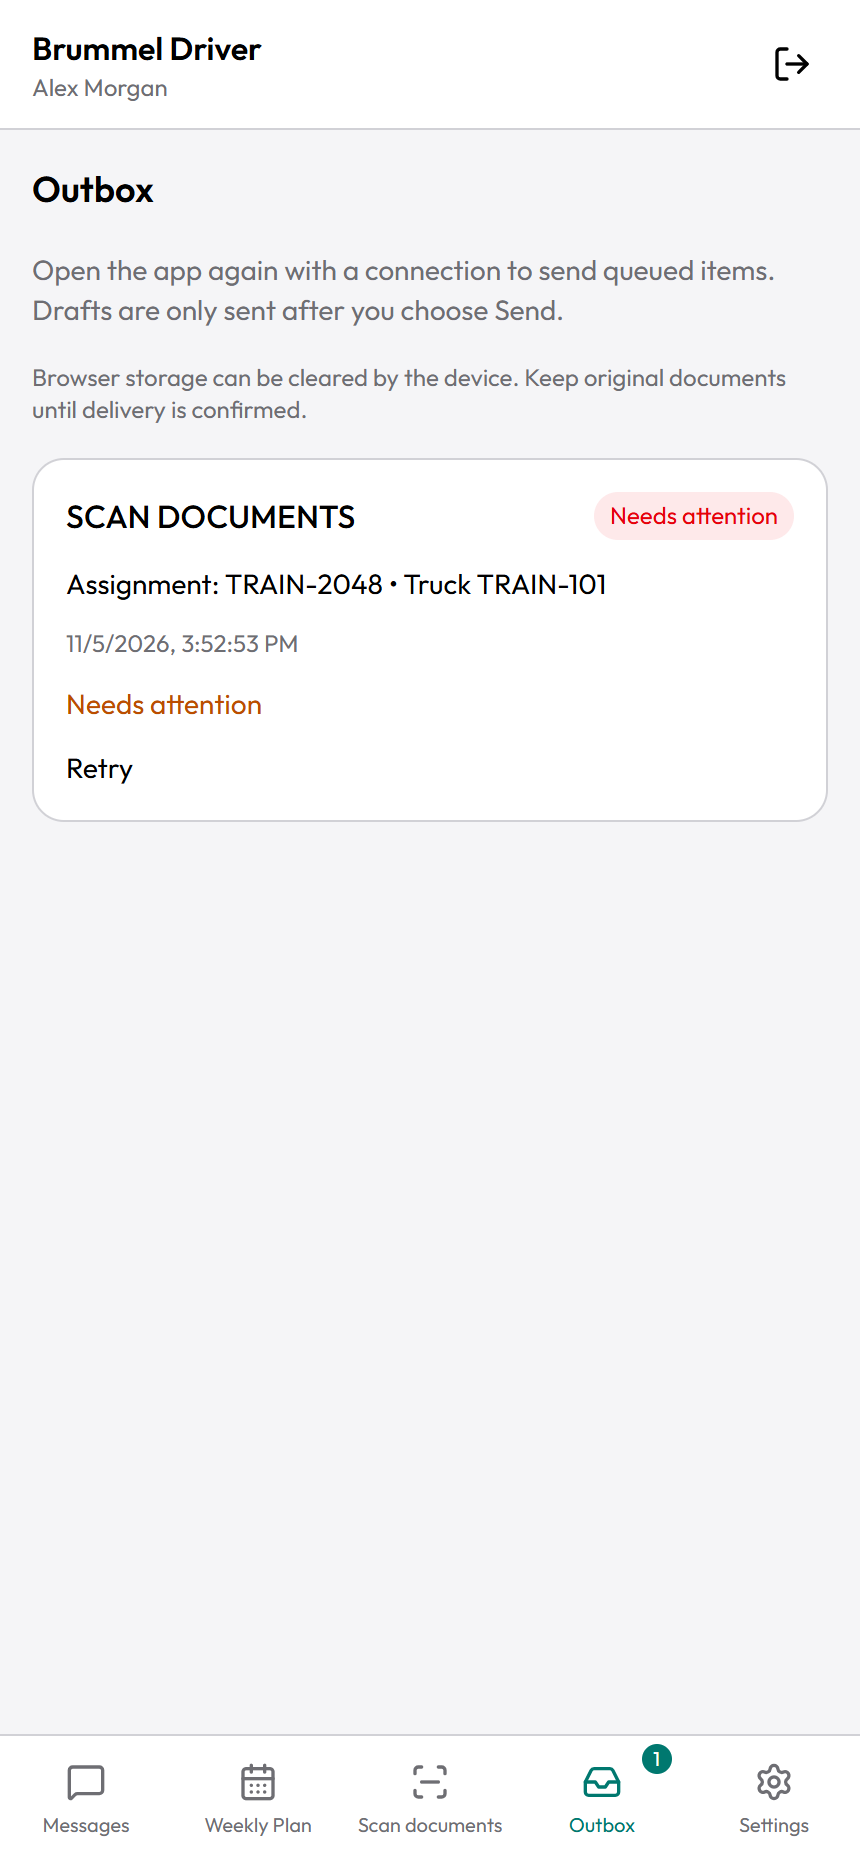
Needs attention means you must read the guidance. Correct the stated problem before trying again.
Use Retry only when Driver offers it for that item. The app checks the existing operation.
Received by Brummel confirms receipt. Read the Delivery confirmed time. Keep your originals until you see that confirmation.
If the item stays blocked, ask your existing Brummel contact. Avoid signing out or clearing browser storage while work is pending.
The narration is AI-generated. The written steps teach the same task.
Follow these steps
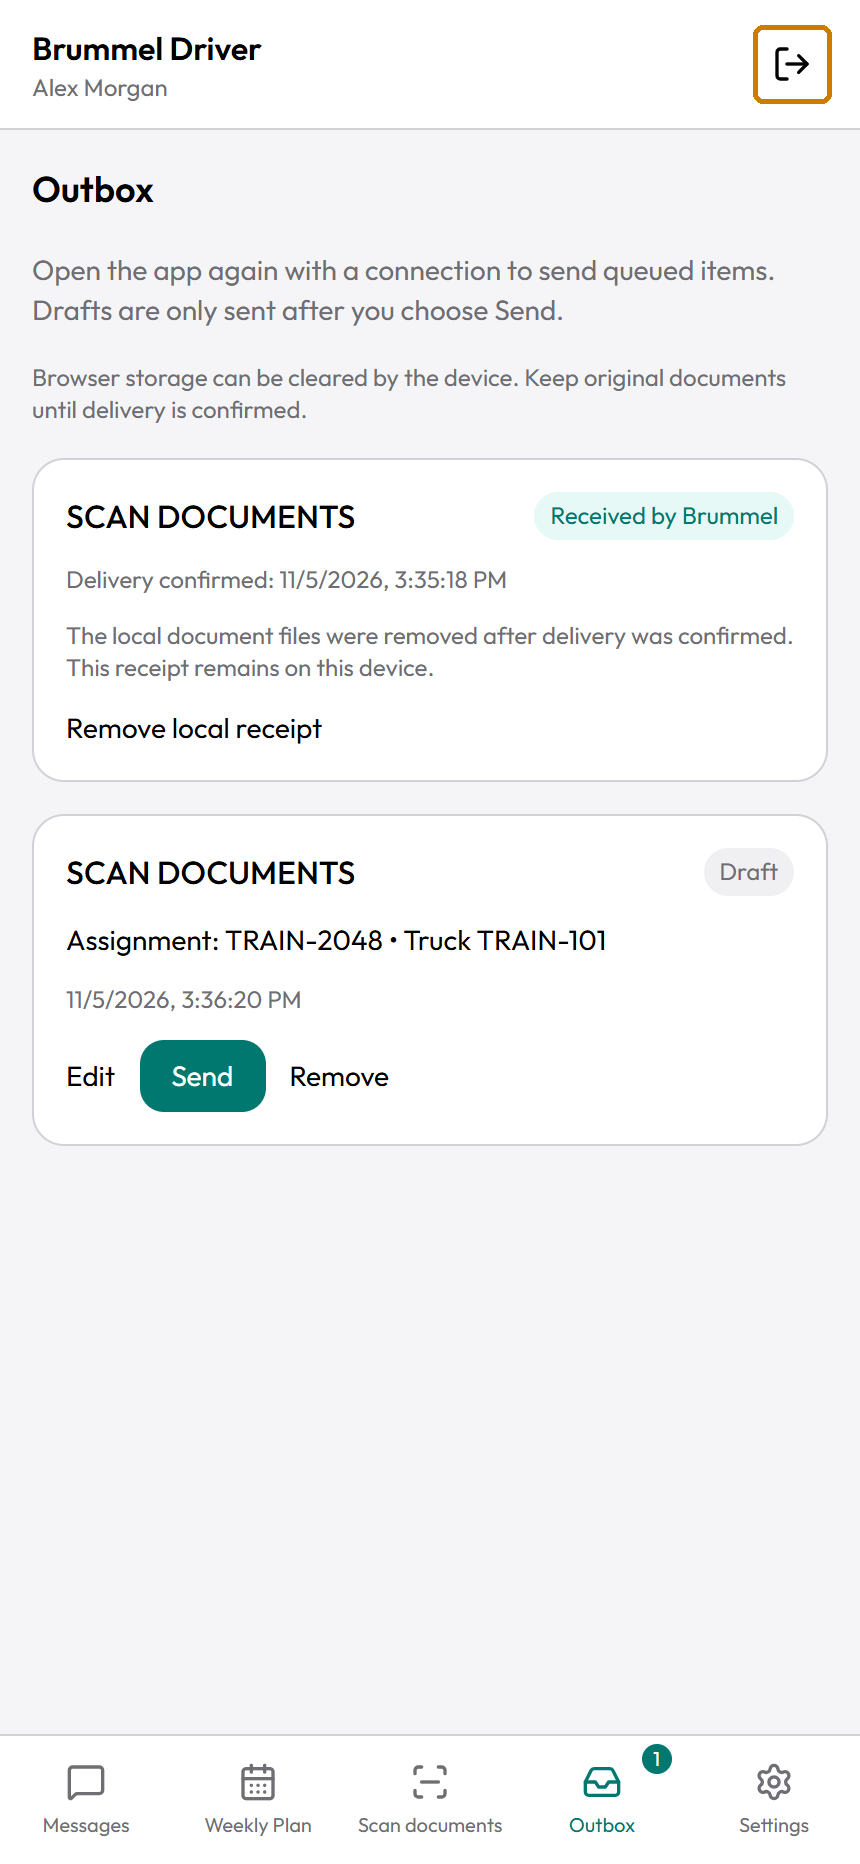
Tap Outbox.Outbox shows your scanned-document drafts, pending scans, and local delivery receipts.Received by Brummel and Delivery confirmed identify a local receipt. Training example.
Find the item you need.Read the document details that are shown. Before submitting a draft, confirm its assignment and type in the scanner.
Read the status label.Draft: saved locally, not submitted. Waiting to send: queued. Sending: in progress. Checking delivery: verifying the result. Needs attention: blocked. Received by Brummel: receipt confirmed.
Tap Edit on a document Draft if you want to change it.The scanner opens with the saved pages.
Or tap Send on the document Draft when you are ready to review it for sending.This also opens the scanner. This button alone does not submit the document.
Review the document pages.Use the scanner chapter if any page needs correction.
Tap Next when the pages are ready.The assignment and document details appear.
Check the assignment, document type, and required photos.They must match the document you intend to submit.
Tap Review and send.Driver prepares the review dialog. Sending has not started yet.
Review the page images and recognized text.Check the whole packet before submitting it.
Tap Send document when the packet is correct.Driver checks the current assignment, queues the document, and opens Outbox.
If Needs attention appears, read the guidance.Correct the stated problem before trying again.Needs attention is not a receipt. Read the guidance and use Retry only when offered. Training example.
Tap Retry only if Driver offers it for that item.The existing item enters Checking delivery. It is not a new submission.
Wait while the item is Sending or Checking delivery.Keep the app visible. Do not create another copy.
Check for Received by Brummel.Read the Delivery confirmed time. Local document files are removed after confirmed delivery; the receipt remains on this device.
Use Remove for an unneeded document Draft.Read the confirmation. This discards the local unsent draft.
Use Remove local receipt only if you no longer need a received document's local receipt.The confirmation says the confirmed delivery is not affected. This action does not recall the document.
A Draft is saved on this device. It has not been submitted yet. Training example.Checking delivery means the result is still being checked. Wait before creating another copy. Training example.
You are done when
The item has the intended final status, or you have identified the exact issue that needs help.
If something goes wrong
Items do not move while offline.Reconnect and keep Driver open in the foreground. Queued items can resume. A document Draft still needs scanner review and Send document.
The item needs assignment review but no Retry button appears.Do not make blind repeats. Check the current assignment and ask your dispatcher if the item cannot be safely corrected.
Driver access could not be verified. appears.Check that you are signed in with the same Driver account. Ask your existing account contact if access still fails.
Browser storage was cleared or you changed devices.Local drafts may be missing. Use your retained originals and check whether Brummel already received the work before creating another submission.
Keep in mind
No pending drafts. means this device's scanned-document Outbox has no rows. It does not describe Message queue or another device.
Keep original documents until delivery is confirmed. Do not sign out, clear browser storage, or remove the browser while important work is pending.
A received local receipt may show only Scan documents and Delivery confirmed, without the earlier assignment or document type. Check the time and your submission carefully; ask your Brummel contact if you cannot identify a receipt.
TUTORIAL 12
Check Message queue and recover a pending message
What you will do
Review and send local text, file, photo, and voice drafts.
Before you start
Open Messages.
Use the same account and device where the draft was saved.
Follow these steps
Tap Message queue at the top of Messages.Pending messages and chat attachments appear.Message queue holds pending chat items on this device. Training example.
Read the item's text, file name, and status.Draft is local only. Waiting to send, Sending, and Checking delivery are still pending. Needs attention requires review.
For a text Draft, tap Edit.The text-edit form opens.
Correct the text.Check the conversation and the new wording.
Tap Save to keep the correction.The updated text appears in the draft.
Or tap Cancel to leave the form without that text change.The previous saved draft remains.
For an attachment Draft, check the listed attachment.Check the file-name text and attachment count. The queue does not provide an attachment preview. If it is wrong, remove the draft and choose the correct file in the conversation.
Tap Send on the correct Draft.The item enters the delivery process.
Keep Driver open with a connection.Do not create another copy while it says Sending or Checking delivery.
Use Retry only if it is offered for a blocked item.Driver checks the existing operation before retrying.
Tap Conversations after the item leaves the queue.Open the intended chat and check that the message or file appears.
To discard an unsent Draft, tap Remove.Confirm only for the intended local draft.
Use Remove blocked message locally only when you intend to remove that local copy.Read the warning. Delivery may already have occurred; this does not cancel or delete a delivered message.
You are done when
The message appears in the correct conversation and is no longer pending, or you have intentionally retained or removed its local draft.
If something goes wrong
No pending messages. appears.This queue has no pending rows on this device. Tap Conversations to check the sent messages.
You cannot leave while recording.Finish or cancel the voice recording before leaving.
An unsaved attachment attempt blocks leaving.Use Discard unsaved attachment attempt only if you intend to abandon that attempt. Read the confirmation; saved messages and files are kept.
Needs attention remains without a usable recovery action.Keep another copy if needed. Check the conversation and ask your existing Brummel contact before resending.
Keep in mind
Message queue and Outbox are different. Message queue is for chat items. Outbox is for scanned document packets.
Removing a blocked local item does not prove it was never received.
TUTORIAL 13
Set your language and appearance, then sign out safely
What you will do
Choose a readable display and protect unsent work.
Before you start
Sign in.
Before signing out, check both Message queue and Outbox for pending work.
Watch this task
Read the video transcript
Settings and safe sign-out
Choose a readable display in Settings. Before signing out, protect any work that is still waiting to send.
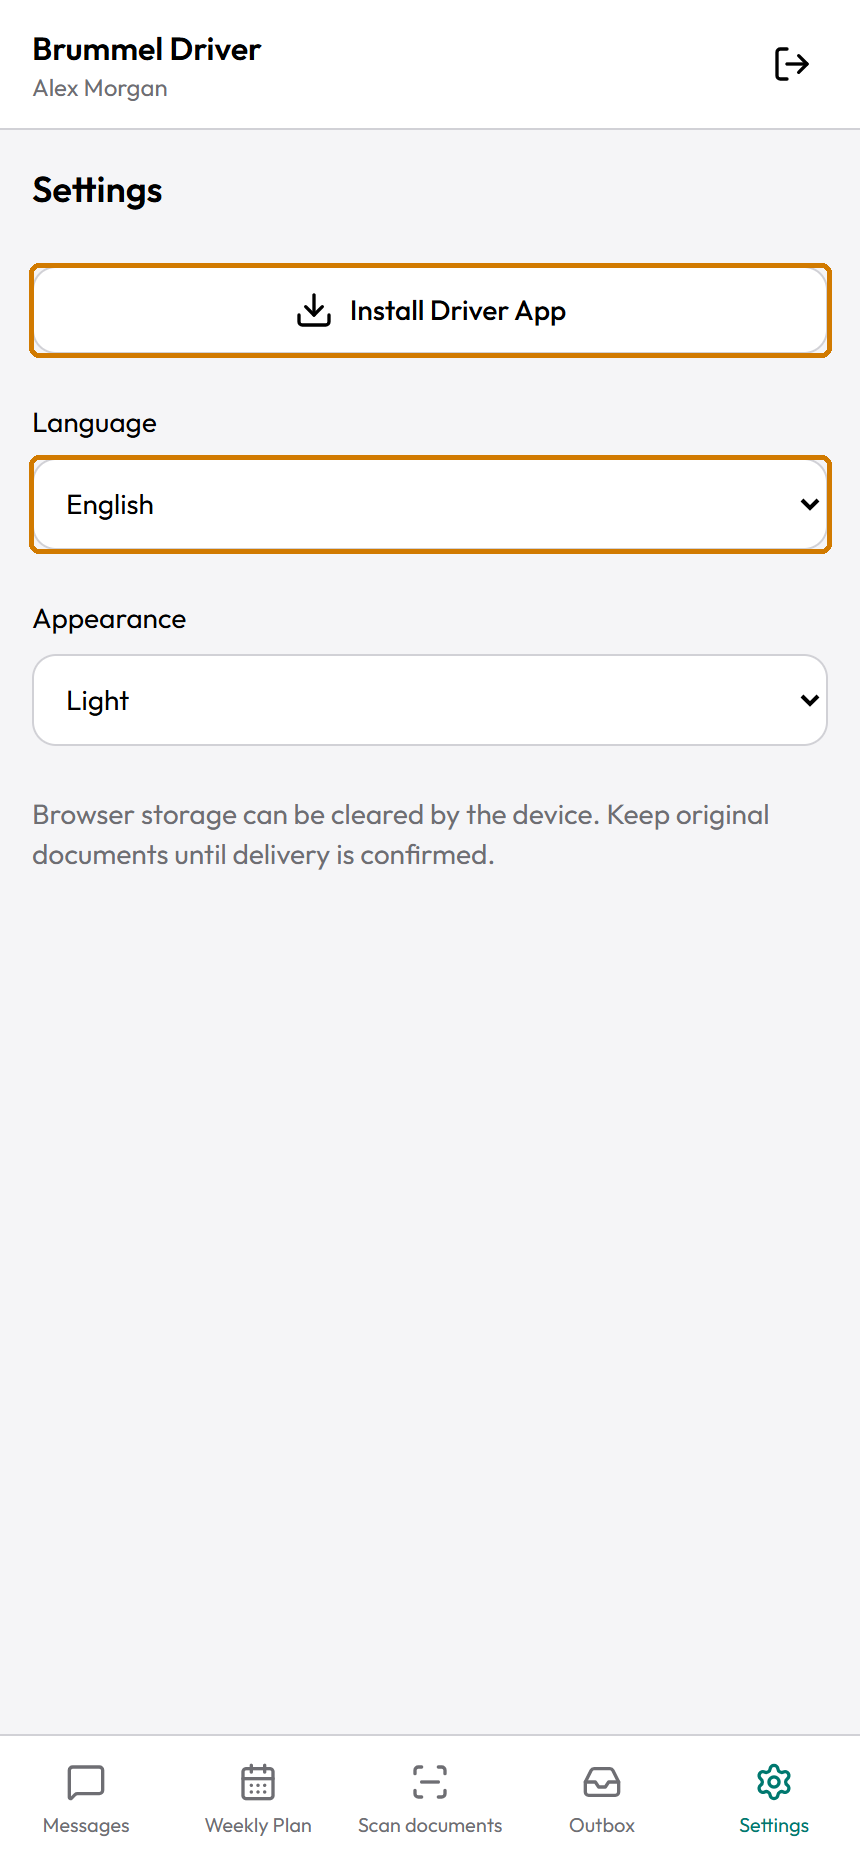
Tap Settings, then open Language. Choose English to match the words used in this training.
Driver reloads in the chosen language. Open Settings again if you want to change the appearance.
Open Appearance. Choose Light or Dark, or choose Auto to follow the device's setting.
Before signing out, check the bottom Outbox tab for documents that are still drafts or pending.
Also open Messages and check Message queue. Finish or intentionally remove any unsent work.
Tap the Sign out icon at the top. If Driver shows an unsent-work warning, read it carefully.
Cancel if you need to keep that work. Confirming sign-out discards unsent work stored on this device.
You are signed out when the sign-in screen returns. Use your own account when you come back.
The narration is AI-generated. The written steps teach the same task.
Follow these steps
Tap Settings.Settings opens.Use Language and Appearance to make the screen easier to read. Training example.
Tap Language.Choose English, Português, or Español.
Choose English to follow this training.Driver reloads with English labels.
Tap Appearance.Choose Auto, Light, or Dark.
Choose the display you can read comfortably.Auto follows the device or system setting.
Use Install Driver App if you want a Home Screen icon.Follow the installation chapter; opening the instructions alone does not install it.
Before signing out, check Outbox and Messages > Message queue.Finish or intentionally remove any unsent work.
Tap the Sign out icon at the top.If unsent work exists, Driver shows a warning.Check pending work before signing out. This view shows a Draft that is still saved on the device. Training example.
Read the warning before continuing.Signing out discards unsent work saved on this device.
Cancel the warning if you need to keep the work.Return to the pending item in Outbox or Messages > Message queue.
Confirm only when you intend to sign out.The sign-in screen appears.
You are done when
The chosen appearance or language is visible, or the sign-in screen appears after an intentional sign-out.
If something goes wrong
The app uses a language you do not understand.Open the gear tab, then choose English in the language list.
You signed out with unsent work.The warning states that unsent local work is discarded. Check receipt with your existing Brummel contact before recreating an item.
You do not see notification settings.Settings does not show a notification control here. Do not assume the Home Screen icon enables notifications.
Keep in mind
There is no password-reset or support phone number shown in this Driver screen. Use your existing Brummel contact for account help.
TUTORIAL 14
Reply, forward, copy, or remove messages
What you will do
Use the extra conversation controls carefully.
Before you start
Open the correct conversation.
Check the message and recipient before any action.
Follow these steps
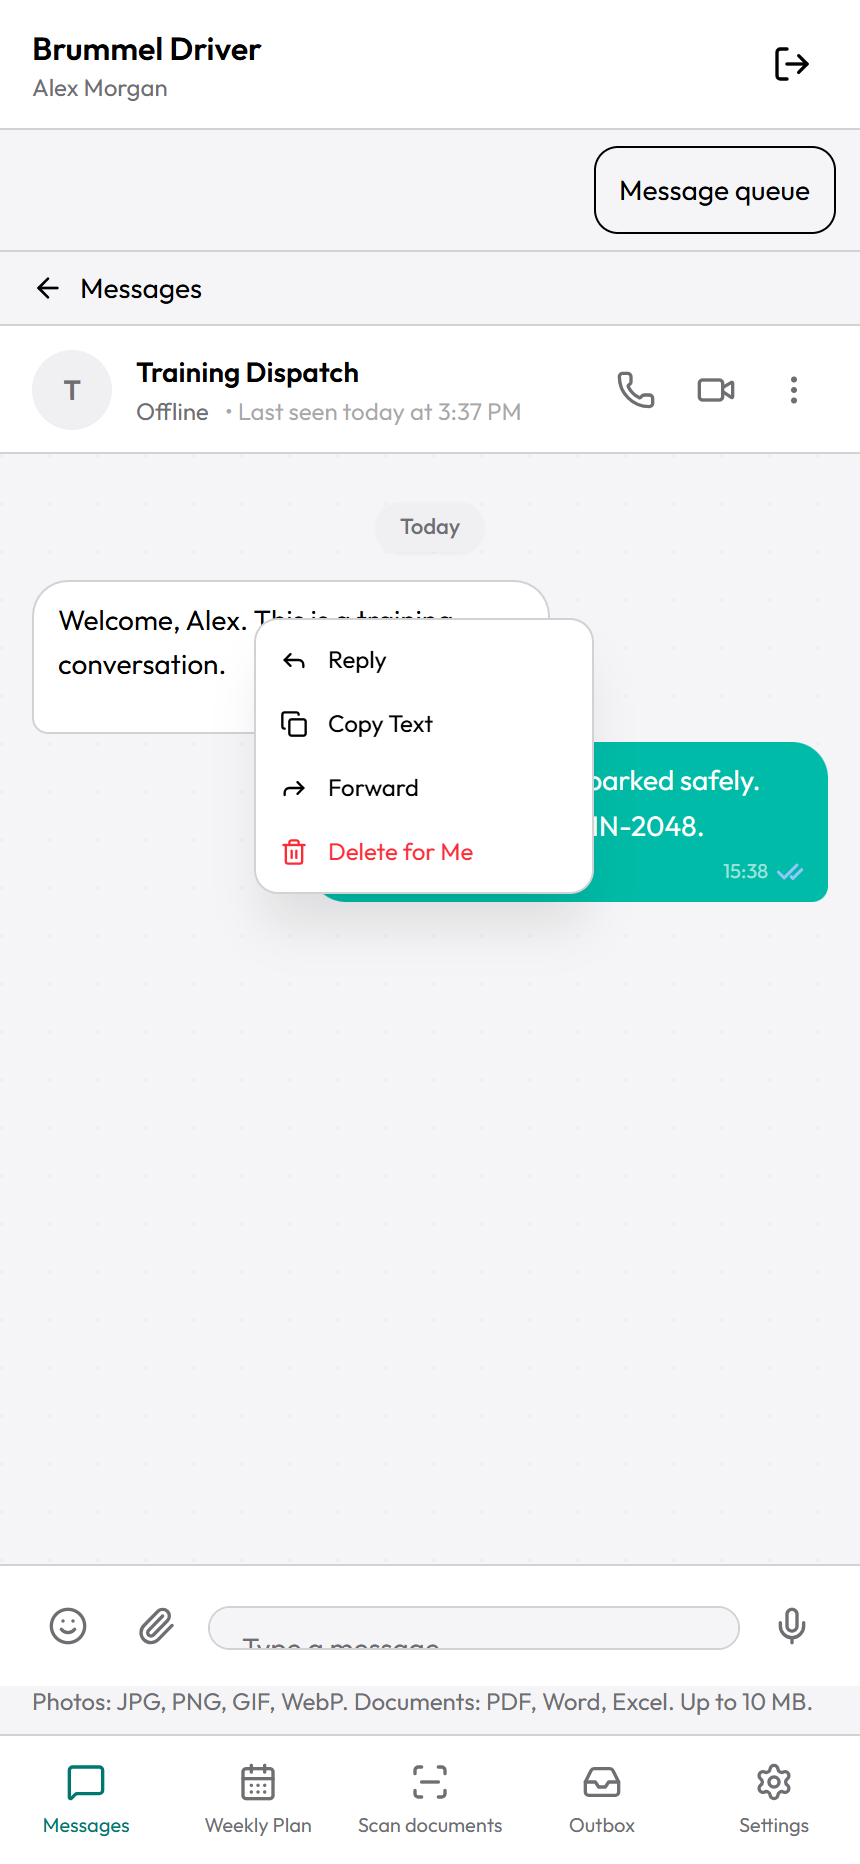
Try pressing and holding the message to open its action menu.This depends on your mobile browser. On a computer, right-click the message. If the Driver menu does not appear, do not continue with these menu steps.The message menu contains actions for the selected message. Training example.
Choose Reply to answer a specific message.A reply preview appears above the text box.
Enter your reply.Check the original message named in the preview.
Tap Send.Check the conversation and Message queue for completion.
To cancel the reply, close the reply preview before sending.Your next message will not quote that preview.
Choose Copy Text from a message menu if you need its text.Paste it in the intended field to check the copied text.
Choose Forward to share a message to another allowed conversation.The forward dialog shows a preview.
Search for the destination if needed.Check the destination name before choosing it.
Tap the intended destination.The forwarded message is sent to that conversation. Do not forward private material to an unintended person.
Choose Delete for Me only to remove the message from your own view.The message disappears from your view.
Choose Delete for Everyone only when offered on your own message and intended.The content changes to a deletion notice. Others may already have seen or saved it.
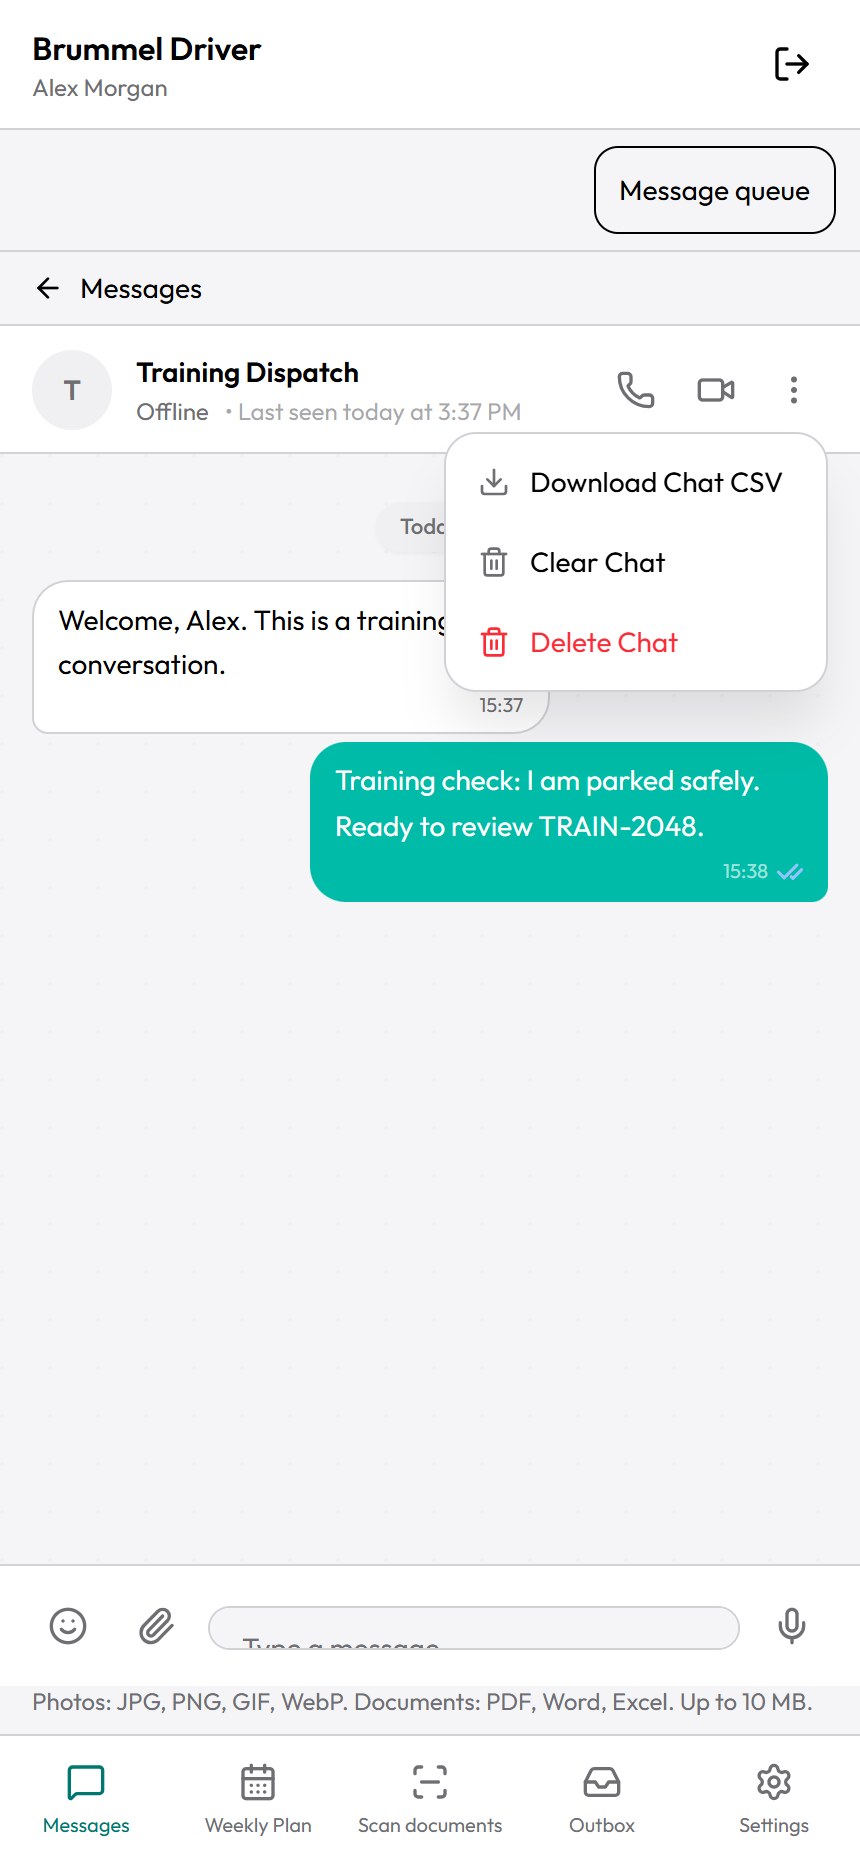
Tap the three dots at the top of a conversation to open chat tools.Download Chat CSV, Clear Chat, and Delete Chat are shown where allowed.The chat menu acts on the current conversation. Read each choice carefully. Training example.
Choose Download Chat CSV if you need a text table of the chat.Find the downloaded CSV in your browser's downloads. It is not a full copy of attached files.
Choose Clear Chat only if you intend to clear your personal message view.The interface acts immediately. Other participants keep their messages.
Choose Delete Chat only if you intend to remove the conversation from your list.The interface acts immediately. Do not use it as a way to cancel a sent document.
You are done when
The selected action has the expected visible result in the intended conversation.
If something goes wrong
Pressing and holding opens a browser menu instead.Close that menu. This device may not expose the app's message menu reliably; use the basic chat controls or seek help.
Forward is missing.Some items, including assignment-offer cards, cannot be forwarded.
A delete or clear action appears to undo itself.The server may have rejected it. Reopen the conversation and check the current state instead of repeating blindly.
Keep in mind
Clear Chat and Delete Chat do not show an extra confirmation in this interface. Read the menu carefully before tapping.
Copy Text may not show a success message. Paste into a safe field to check it.
TUTORIAL 15
Use group chats and broadcast channels
What you will do
Find group members and create a group when needed.
Before you start
Sign in and connect.
Use only the contacts offered to your account.
Follow these steps
Tap Messages.The conversation list opens.
Tap Groups to find group conversations.Choose All again to include direct chats and channels.
Tap a group to open it.Check its name.
Tap the group name in the header.A member list opens.
Check the participants.Confirm which people belong to the group.
Tap X to close the member list.The conversation returns.
To create a group, return to the conversation list.The list is visible.
Tap +.A small menu opens.
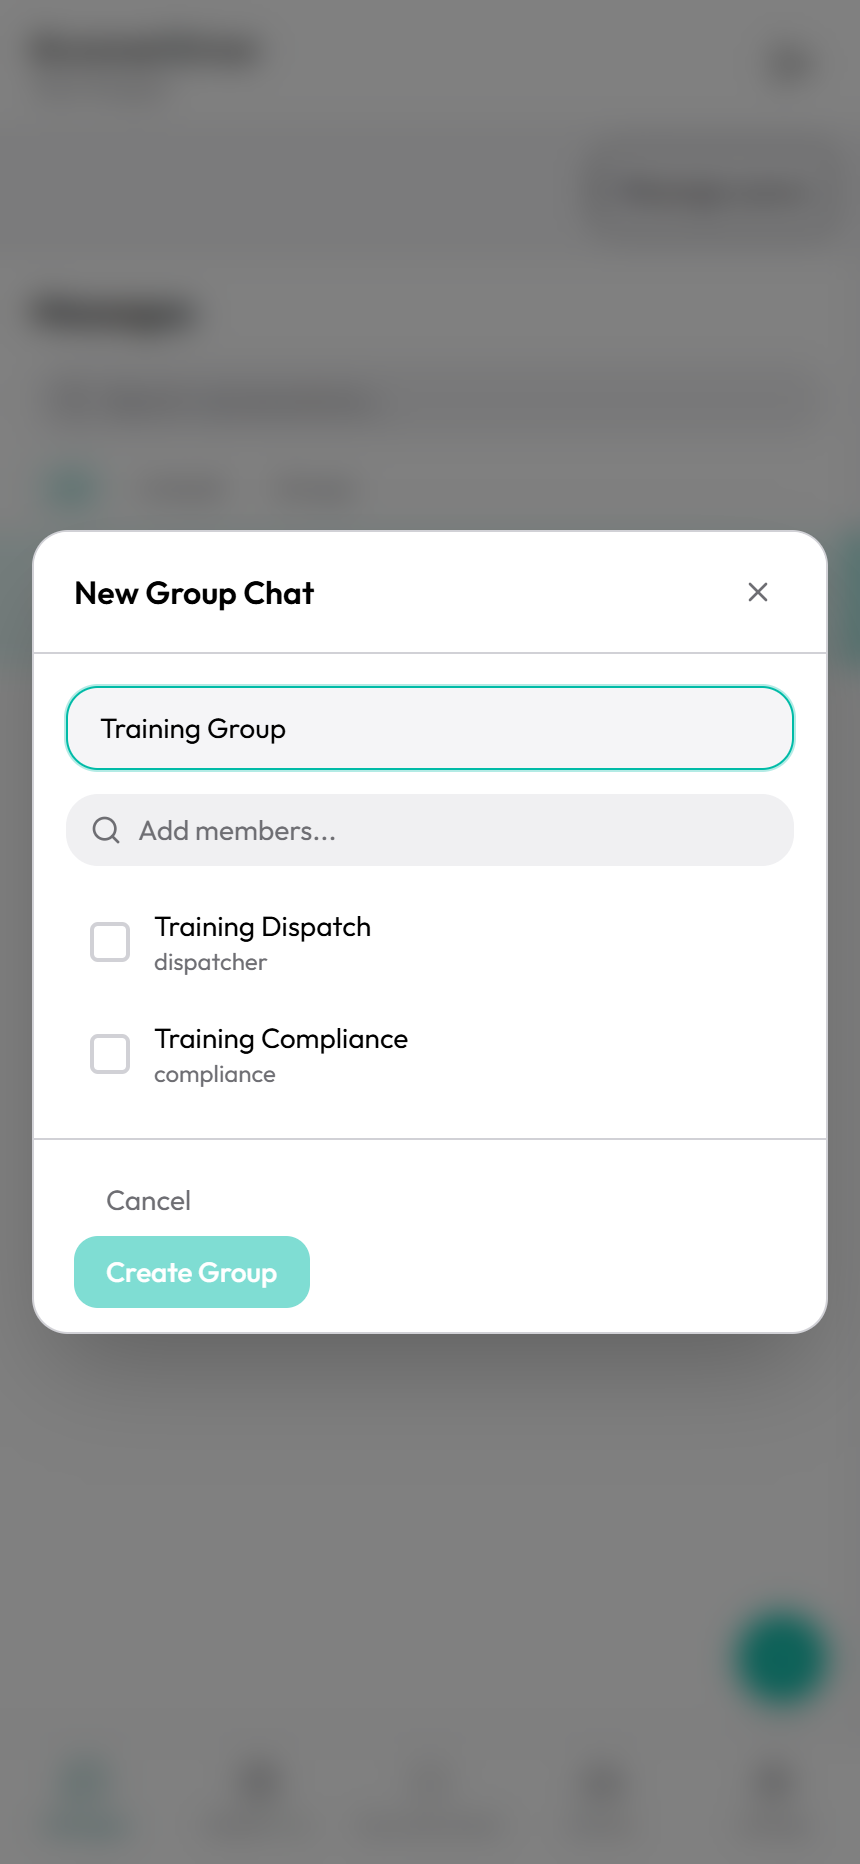
Tap New Group.The group form opens.Choose the group name and the intended members before creating it. Training example.
Enter Group Name.Use a clear name appropriate for your real work.
Choose each intended member.Check all selected names.
Remove a selected name if it is wrong.That person will not be included in the new group.
Tap Create Group.The group is created and appears in Messages. Use Cancel to leave the form instead.
If you created the group, open its three-dot menu.Add Members is available to the group creator.
Tap Add Members.The contact selection form opens.
Select the contacts you intend to add.Check each selected name.
Tap Add Members in the form.Check the group member list afterward.
To read a broadcast channel, open it from All.Only the channel creator can send. A driver cannot create a new broadcast channel.
You are done when
The correct group opens with the intended members, or you have read a broadcast post.
If something goes wrong
Add Members is missing.This control is limited to the group creator.
A person is not offered.Your account's contact permissions control the list. Ask your existing Brummel contact.
You cannot type in a channel.Use a separate allowed conversation to respond to the sender.
Keep in mind
Creating groups does not change company responsibilities or grant access to other Driver features.
TUTORIAL 16
Open, download, or print a private report
What you will do
Read a report sent to your account.
Before you start
Open the conversation that contains the report.
Connect to the internet.
Use your own Driver account.
Follow these steps
Tap the private report's file name in the conversation.Private report opens.
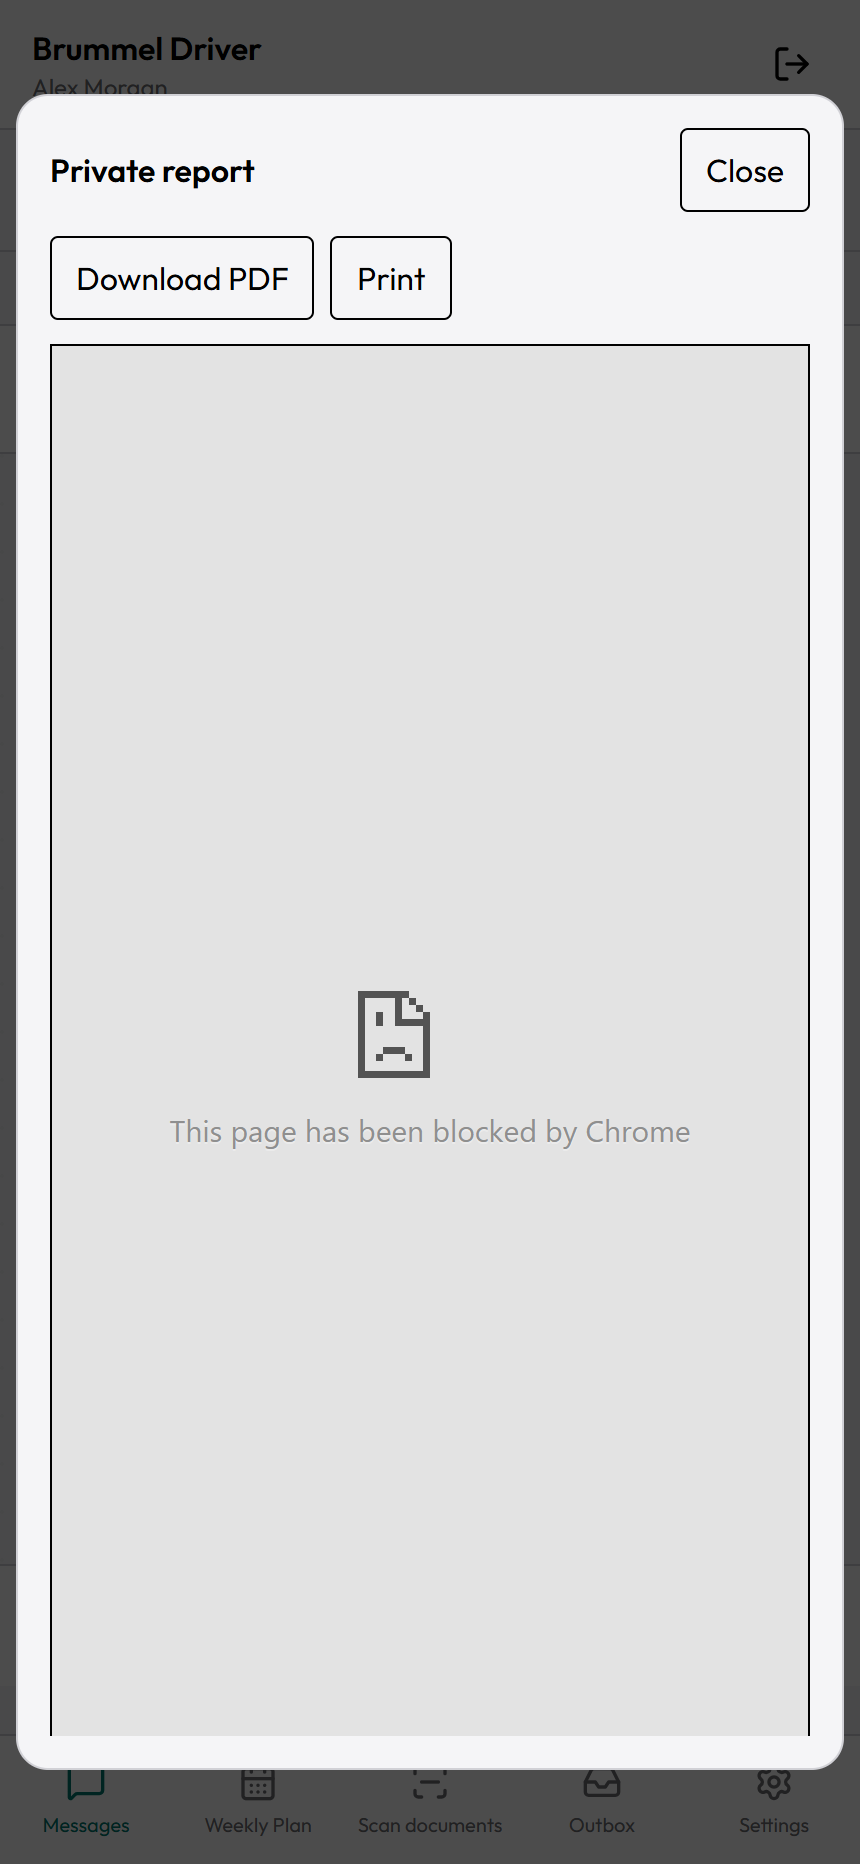
Wait while Driver verifies and loads it.When access is valid, Download PDF and Print become available. Your browser may show the PDF preview below them.Report controls include Download PDF and Print. This browser blocked the inline preview; use a supported option if this happens on your device. Training example.
Read the report.Scroll within the preview if needed.
Tap Download PDF if you need a copy.The browser saves the PDF or offers a download.
Open the downloaded file if you want to check it.Use your phone's downloads or PDF application.
Tap Print in the report viewer if you want to print.Use the system print dialog if your device supports it.
If the viewer asks you to download for printing, tap Download PDF.Open that PDF in an application that supports printing.
Tap Close to return to the conversation.Keep downloaded reports private.
You are done when
The report is readable, or the PDF has downloaded or opened in your print application.
If something goes wrong
The report is unavailable or access changed.Close the viewer and reopen it. If it still fails, ask the person who sent it or your existing Brummel contact.
Print does not open a usable dialog.Download the PDF and print from a PDF application.
The preview is blank or says the browser blocked it.Tap Download PDF. Open the downloaded file in your phone's PDF application. If downloading also fails, close the report and reopen it while connected.
Keep in mind
This task reads a report sent to you. It does not create settlements, approve payments, or change financial records.
TUTORIAL 17
Review and respond to an assignment offer
What you will do
Read an incoming offer carefully before accepting or declining it.
Before you start
Use this chapter only if an assignment offer appears in your conversation.
Connect to the internet.
Use your actual offer at work. TRAIN-2048 in this training is fictional.
Follow these steps
Tap Messages.The conversation list appears.
Open the conversation containing the offer.Check the sender and conversation name.
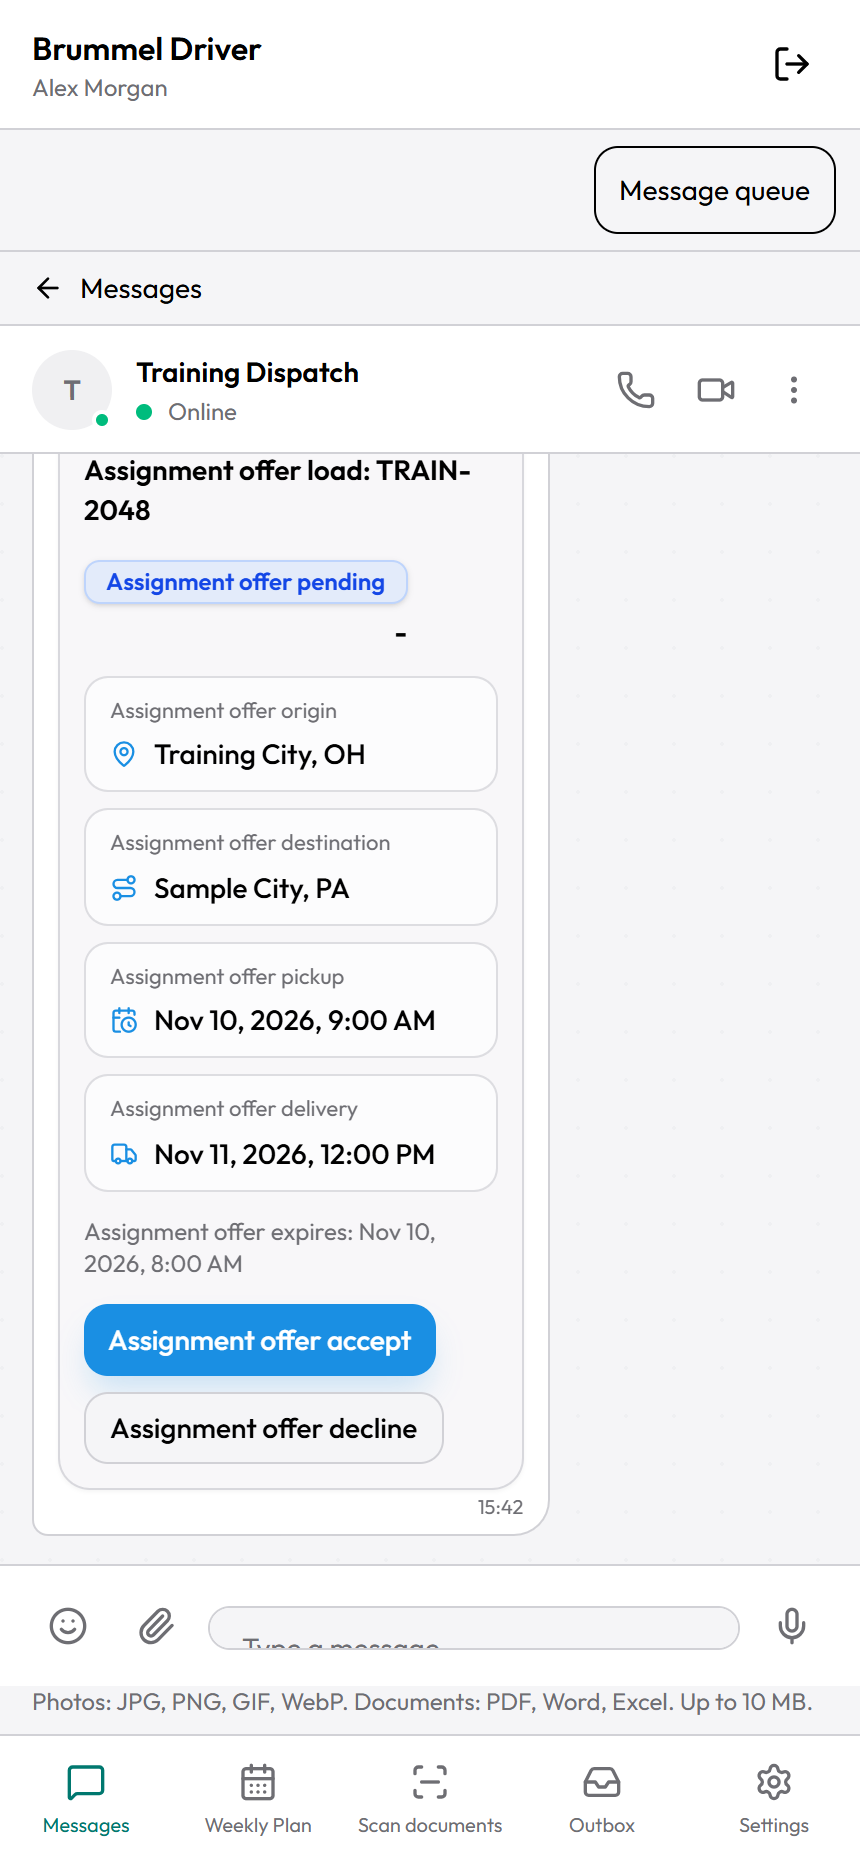
Find the assignment offer card.The card shows a load number, status, route, and dates. Its heading may read ASSIGNMENT OFFER TITLE.Read the assignment offer and the available response controls before choosing a response. Training example.
Check the load number.Make sure this is the offer you intend to answer.
Read the offer status.Response buttons are available only for an incoming Pending offer. Accepted, Declined, or other completed response states do not offer another response.
Review the origin and destination.Confirm the proposed route.
Review the pickup and delivery dates and times.Check the times displayed on your screen.
Review the expiration time if shown.If the offer is unclear or appears out of date, ask your dispatcher before responding.
Tap Assignment offer accept only if you intend to accept.The response starts immediately. There is no extra confirmation screen.
Or tap Assignment offer decline if you intend to decline.Choose only one response. The response starts immediately.
Wait for the updated status.Assignment offer accepted or Assignment offer declined confirms the response shown by Driver. The response buttons become unavailable.
Read any error shown on the card.If the status has not updated, do not assume your response succeeded. Check the card again and contact your dispatcher if needed.
You are done when
The card shows the response you intended, or you have contacted your dispatcher about an unresolved offer.
If something goes wrong
The response buttons are unavailable.Check the status. The offer may already have a response or no longer be pending. Ask your dispatcher if you need a change.
The card shows an error after your response.Read the error. Restore your connection if needed, then check the current card status before trying again.
The offer details are wrong or unclear.Use your existing dispatcher contact to clarify the offer before responding.
Keep in mind
The current screen may use labels such as Assignment offer accept and Assignment offer decline. Follow the full label you see.
Responding to an offer does not submit a BOL, POD, or other document. Use Scan documents for that separate task.
TUTORIAL 18
Solve common problems and know when to ask for help
What you will do
Choose a safe next step when the screen does not match your goal.
Before you start
Park safely before troubleshooting.
Keep original documents and any important unsent information.
Follow these steps
Read the exact message on the screen.Notice whether it concerns access, connection, files, assignment, or delivery.
Check your connection.Try reopening the Driver website when connected.
Check the correct pending-work area.Messages > Message queue contains pending messages and chat attachments. Outbox contains scanned documents.
Check the current item before repeating a send.Waiting to send, Sending, and Checking delivery are not failures that require a duplicate.
Check browser permissions when camera or microphone fails.Allow the needed permission for the real Driver website, then reopen the camera or recording task.
Check the assignment if a document cannot send.Use the correct current load. Never choose an unrelated load just to continue.
Keep Driver open while pending work is being sent.Switching away or closing the app can pause foreground work.
Ask your existing Brummel contact when the issue remains.For a load or recipient problem, use your existing dispatcher contact. For login, use the contact who gave you the account.
Describe what you were doing and the exact message you saw.Do not send your password or verification code.
Include whether the item is a draft, pending, or already received.This helps avoid a duplicate operation.
You are done when
The task reaches its real completion state, or your existing contact has the details needed to help.
If something goes wrong
Does saved mean sent?No. Saved on this device is local. A message must leave Message queue and appear in the conversation. A scan needs Received by Brummel in Outbox.
Can I work without a connection?Some existing local drafts remain available, but sign-in, current assignment checks, Weekly Plan changes, and delivery need a connection. Do not assume all screens work offline.
Will signing out keep unsent work?No. The sign-out warning says unsent work on this device will be discarded.
Can I use any load to submit a document?No. Select the actual assignment. Contact dispatch if the proper assignment is missing.
Does Received by Brummel mean the office approved the document?It confirms receipt. It does not by itself confirm a later office review or approval.
Where is the support phone number?No support number or email was confirmed for this training. Use the Brummel contact information you already have.
Keep in mind
The guide does not promise background notifications, locked-screen calls, or features limited to administrative roles.
The sample data is fictional. Never submit SAMPLE — TRAINING ONLY documents into live operations.